In the previous guide, I showed you how to program an 8051 Microcontroller in Keil µVision IDE. The C51 Compiler of the Keil µVision IDE is arguably the best C Compiler out there for 8051 Microcontrollers. However, the problem with the free or Evaluation version of the Keil µVision IDE is its limitation on Object File size (among other things). No matter how large your source file is, the IDE can generate up to 2KB of Object Code. If a program generates more than 2KB of object code, the IDE will not compile it.
This is okay if your application is very basic (blink and LED or read from a button, etc.). What if you integrate a lot of peripherals with the 8051 Microcontroller? Surely, the final Object code will become large (possibly more than 2KB). So, what’s the solution? PlatformIO seems like a decent answer to this problem, thanks to its integration of SDCC (Small Device C Compiler). In this guide, I will show you how to program an 8051 Microcontroller in PlatformIO.
I will take you through all the steps that you need to follow in order to successfully generate the final HEX File for an 8051 Microcontroller in PlatformIO.
What is PlatformIO?
I already talked a great deal about PlatformIO in my STM32G4 with PlatformIO tutorial. Refer to that guide for a detailed explanation of PlatformIO, its components (platforms, frameworks, etc.), the platformio.ini file and many more.
As a refresher, PlatformIO is an extension for VS Code (Visual Studio Code) especially for embedded systems developers. Using PlatformIO, you can work on multiple platforms (microcontroller architectures) without the hassle of setting up any toolchains. The PlatformIO IDE will take care of all that for you and you can simply write applications for your favorite microcontroller.
Among a wide range of platforms, the PlatformIO also supports the Intel MCS-51 Architecture, which we commonly call the 8051.
What about the compiler? PlatformIO uses SDCC or Small Device C Compiler. It is an open source suite of compilers that supports several 8-bit microcontrollers. Here’s a small list of architectures that are compatible with SDCC:
- Intel MCS-51 – 8031, 8032, 8051, 8052
- NXP (formerly Freescale/Motorola) HC08 – HC08, S08
- Zilog Z80 – Z80, Z180, eZ80, TLCS-90
- STMicroelectronics STM8
- Padauk PDK15, PDK15
So, when you try to program an 8051 Microcontroller in PlatformIO, you will inherently use the SDCC.
Installing PlatformIO
I already discussed this in the STM32G4 guide. Here’s a quick recap on how to install PlatformIO. First of all, you need Visual Studio Code (VS Code) on your computer.
Head over to the extensions tab of VS Code, search for ‘Platform IO IDE’ and install it. The process is fairly simple and straightforward.
Restart the VS Code application and you will see the PlatformIO icon appear in the left side activity bar. Click on it to open PlatformIO. Alternatively, you can click the ‘Home’ icon from the bottom Status bar to open PlatformIO. A new tab opens with the name ‘PIO Home.’

How to Install 8051 Platform in PlatformIO?
In the PlatformIO Home, you can see the ‘Platforms’ icon on the left menu bar. Click on it. Select the ‘Embedded’ tab and search for ‘MCS51.’ Click on the result ‘Intel MCS-51 (8051)’ and install it.

PlatformIO will now install all the necessary files, tools, examples, etc. for 8051 Architecture. If you look at the packages, you will find ‘toolchain-sdcc’ as the main toolchain. This confirms that if you want to work with 8051 Microcontrollers in PlatformIO, you have to use the SDCC (Small Device C Compiler).
How to Program 8051 Microcontroller in PlatformIO?
The previous step finishes the installation part of the PlatformIO. Next, we are ready to create our 8051 Microcontroller Project in PlatformIO. Let me show you how to do that.
Create an 8051 Project in PlatformIO
Go back to PlatformIO Home and click on ‘+ New Project’ from the ‘Quick Access’ menu. Or, you can go to the ‘Projects’ tab and select ‘+ Create New Project’ option.
A new ‘Project Wizard’ window pops open. First, provide a name to your project. Since this is just a demo, I gave it ‘1-Demo-Project.’ Next, we have to select the actual microcontroller we are working on. In my case, it is an AT89S52 based development board. So, I selected the ‘Generic AT89S52 (Microchip & Atmel)’ option under the ‘Board’ category.
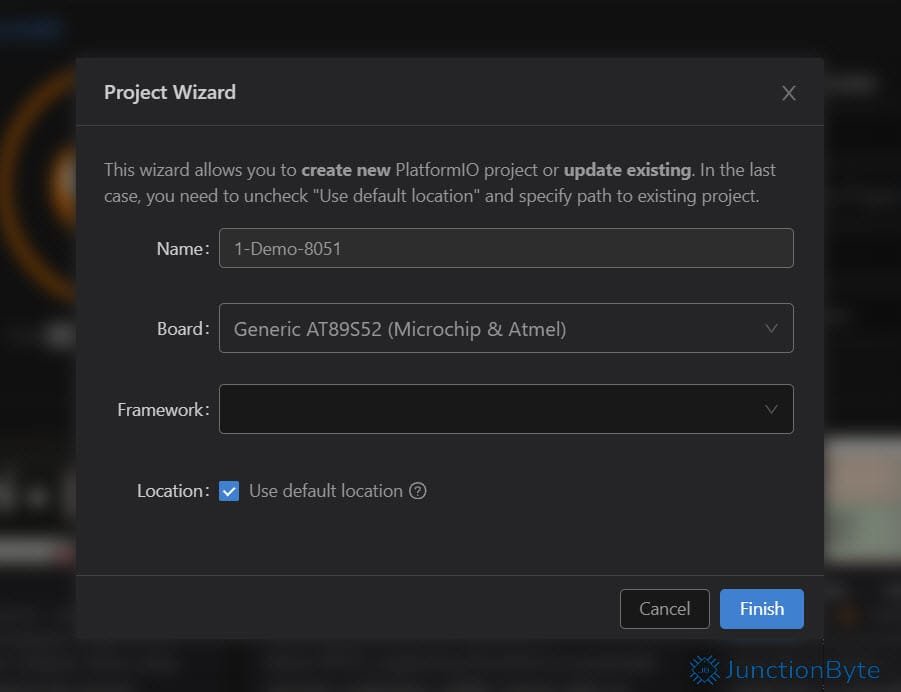
You will not have a choice when it comes to choosing a framework. Lastly, you can either use the default location or select an appropriate location to save your project. Click on ‘Finish’ and the PlatformIO IDE will create the project for you.
Add Main.c Source File
Sadly, that is all that PlatformIO does i.e., it creates a structure for the project. It doesn’t add any source files. You have to manually add all the necessary source files.
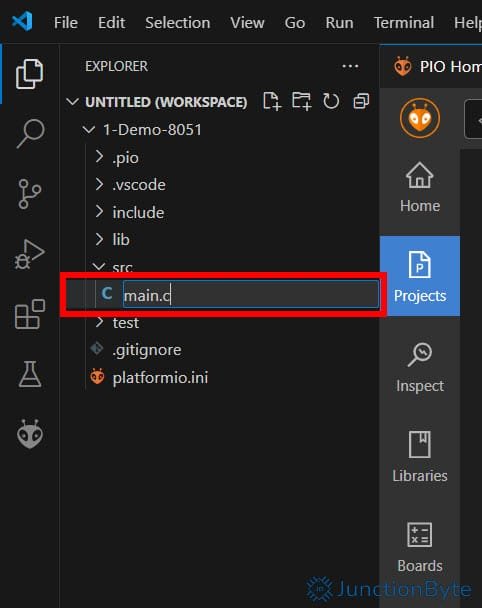
Since we are working with 8051 Microcontroller, we can create a ‘main.c’ file as the main project source file. From the ‘Explorer’ tab in the left, right click on the ‘src’ folder and select the ‘New File…’ option. Give this file the name ‘main.c’ (file name is not important as long as it contains the ‘main’ function).
Open the main.c file (if it is not already open) and use the following case as reference. It is a simple C Program for 8051 Microcontroller where the Pin 0 of Port 1 turns ON and OFF every second. If you connect an LED to this pin (through a current limiting resistor, of course), the LED will blink.
Code
Take a Look at the platformio.ini File
When PlatformIO IDE created the project structure for you, it also created an important file known as ‘platformio.ini.’ It is an important part of the whole PlatformIO IDE experience. The ‘platformio.ini’ is a project specific customization file that allows you to configure the project as per your needs.
If you look at the ‘platformio.ini’ file for this project, the contents are pretty simple.
[env:AT89S52]
platform = intel_mcs51
board = AT89S52
I tried to further customize this file to use the USBASP Programmer and AVRDUDE utility and directly program the 8051 Microcontroller (the AT89S52 version in my case) from PlatformIO. Even after spending an awful lot of time, I couldn’t make it work and realized that an external software (ProgISP has been my go to app) is a much better choice.
Build the Project
We are now ready to build the project. You see the ‘PlatformIO Toolbar’ at the bottom, there is this ‘✓’ symbol next to the ‘PlatformIO Home’ icon. This is the ‘Build’ shortcut button.
Click on it and the IDE will compile the code. If there are any errors, it will show them. Since we are working on a very simple program, it shouldn’t throw any errors and the compilation should be successful.
The IDE might warn you about some keywords (such as SFR and SBIT). You can ignore them as they are a ‘PlatformIO’ issue and not to do anything with our program or the SDCC.
Another thing the PlatformIO IDE does is it creates the HEX file for you. This is the file that we have to upload to the microcontroller. You can find the HEX file in your project directory (it will be under the PIO subdirectory).
Upload Code using USBASP Programmer
As I mentioned already, uploading the code to an old school 8051 Microcontroller directly from PlatformIO IDE is quite difficult. If anyone has done, please do let me know.
We can use the HEX file and upload it to the AT89S52 Microcontroller using any USBASP compatible programming applications. I discussed the steps you need to follow in order to upload the code using ProgISP Software in my previous guide (How to Program an 8051 Microcontroller in Keil µVision IDE). Do check it out for more information.
Conclusion
Final words. In this guide, I introduced the users of 8051 Microcontroller, a great tool in the form of PlatformIO IDE. I also showed you how to program an 8051 Microcontroller in PlatformIO.
This IDE is a great alternative to some of the proprietary and expensive tools. Is it perfect? Well, no. The size of the final object code generated by the SDCC is much larger when compared to the one that the C51 (Keil µVidion IDE’s C Compiler) generates.
However, there are no size limitations and it works great for the majority of our requirements. I can definitely take that as a win.