One piece of technology that sparked my curiosity recently are Mini Keyboards. The ability to assign complex commands to a single button press makes these macro keypads quite interesting. I have been taking some courses on video editing and noticed these professional editors using a second keyboard by assigning shortcuts to the keys. After some basic research, I decided to buy this Mini Keyboard with 15 Mechanical Switches and 3 Rotary Knobs to customize it for speeding up everyday tasks. This is the Mini Keyboard review where I would like to share my experiences of this programmable macro keypad.
I will talk about the hardware (build quality, ease of use) as well as the software (that is useful for programming the keys and RGB). If you are in a creative field (video editing, graphic design, music production, etc.,), then I believe this mini keyboard will be a good addition to ease up your workflow.
This post contains affiliate links. For more Information, see our disclosure here.
Unboxing the Mini Keyboard
Before looking at the contents of the package, I would like to say that when I ordered this keyboard, I expected it to ship with the necessary 2.4 GHz USB RF Receiver (as the product page says that this macropad works in 3 modes: Wired, Bluetooth, and 2.4 GHz RF).
However, later I found out that the 2.4 GHz connectivity is not standard and you need to specifically choose the model that supports it. Bummer!
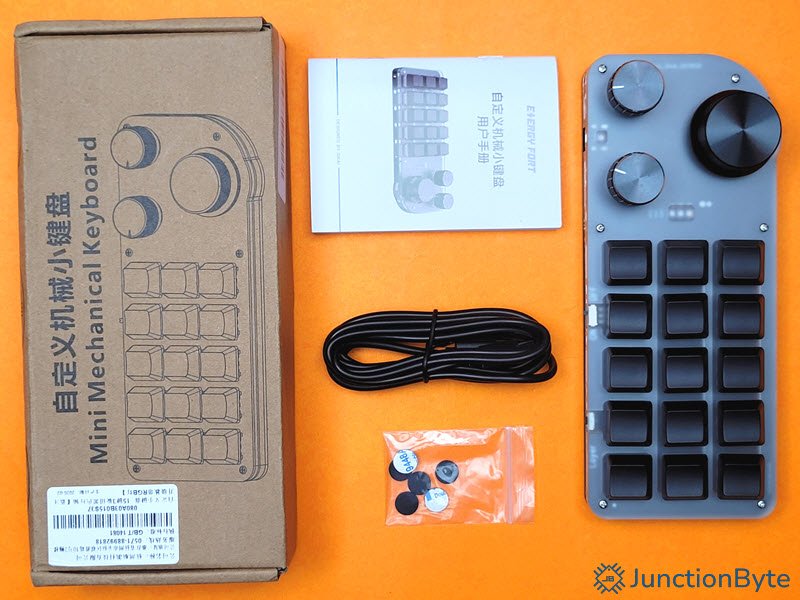
That said, here’s what came in the box.
- 15-Key Mini Keyboard
- USB-A to USB-C Data Cable
- User Manual
- Anti-slip Rubber Feet
The user manual has a link (QR Code) to download the software as well as some basic setup steps. Worth going through.
Design of the Macro Keypad
In the “correct” orientation, the 15-keys are on the left and the three dials are on the right. Ergonomically, it is a good layout as you can easily work with keys and knobs with your left hand (as the right hand will probably control the mouse, at least for the majority of users).
There is some weight to the keyboard and it doesn’t easily slide off of the surface. You can stick the provided rubber feet (against the screws on the bottom) so that the keyboard stays in place.
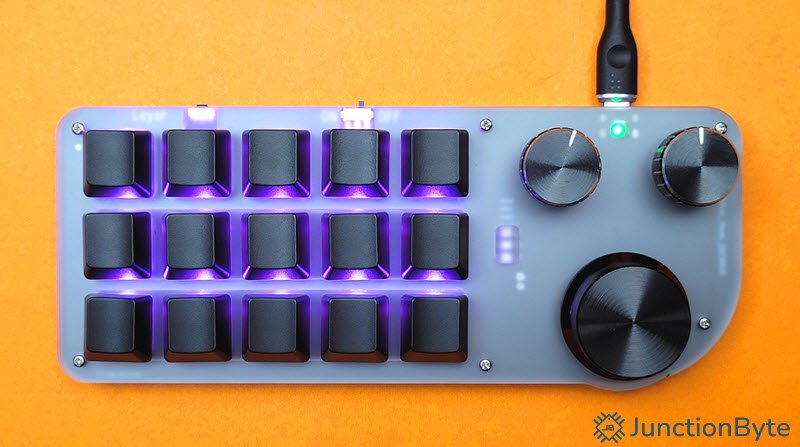
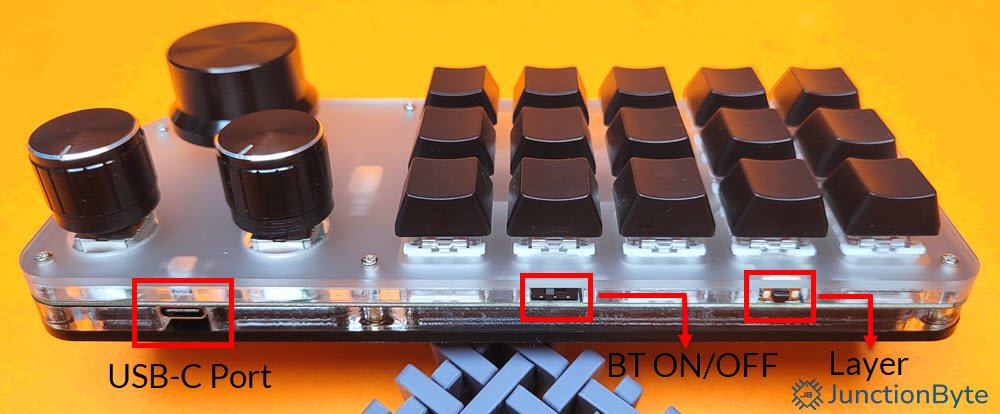
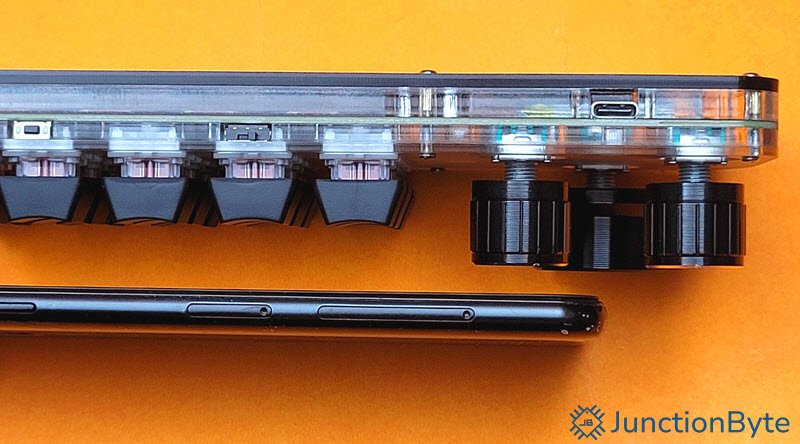
Two of the three dials are of “normal” size while the bottom one is slightly larger in size. The top long edge has three important things:
- A Push Button
- A Slide Switch
- USB-C Port
I will explain the functions of these in the next section.
If you want to get an idea about the size of this mini keyboard, I placed it aside a modern mobile phone. In the first picture, you can see the length of the macropad compared to a phone.
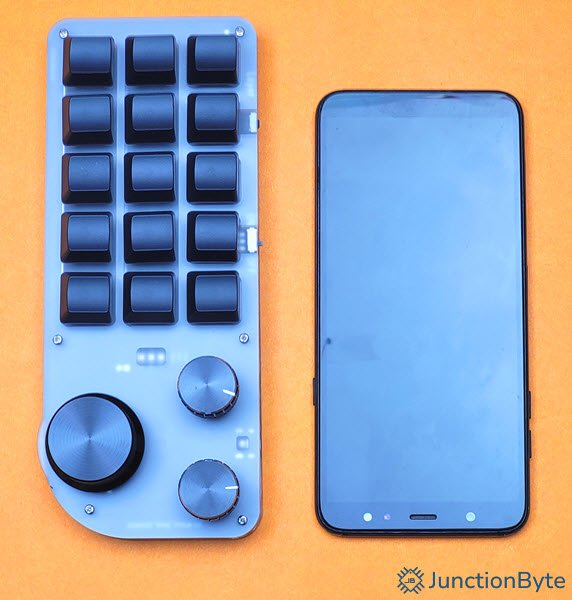
As fast as the thickness is concerned, it is similar to a mechanical keyboard (excluding the rotary knobs, which extend slightly more).
There isn’t anything else worth mentioning. The keyboard has some indicator LEDs, which I will explain later.
Functionality of the Mini Keyboard
Key Switches and Layout
The first important part of this mini keyboard is, well, the keys. It has 15 mechanical keys arranged in 3 rows and 5 columns. And a bonus feature: all the keys are hot swappable. That’s right. You can replace the keycaps as well as the switches, if you are looking for additional customization. Note that the package doesn’t come with a key puller.
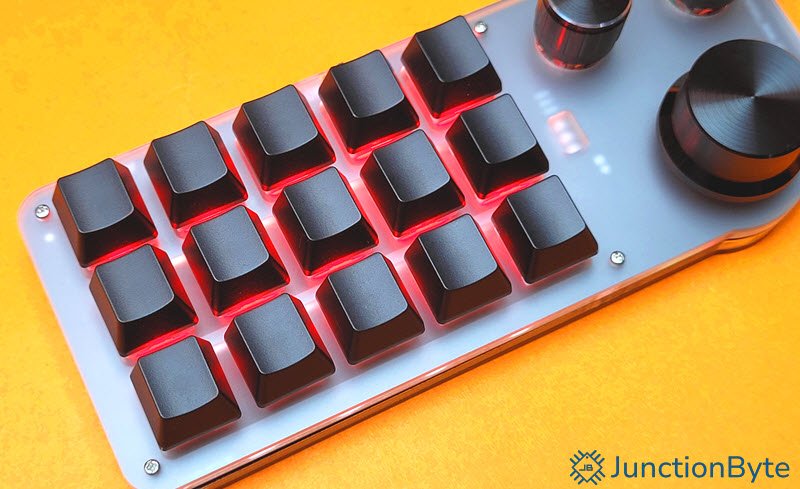
As you might have noticed from all the images, this mini keyboard has RGB lighting. Each key has a dedicated RGB LED. You can set the lighting mode through the software (which I will discuss in a later section).
The switches are silent and don’t have any tactile response. But you can easily replace them, as per your needs. The spacing between the keys is pretty standard and you will quickly attain a muscle memory for the layout of the keyboard.
There are no markings of any sort on the keycaps. So, you need to print some stickers depending on your application. Also, the keycaps are not transparent. So, the RGB light doesn’t traverse to the surface through the keys but rather disperses around the key (still very much visible).
Rotary Knobs
Coming to the dials, they are Rotary Encoders. You can rotate them in either direction continuously. Additionally, you can also push in the center of the knob to activate a switch. So, each dial gives you three functions to customize (rotate left, rotate right, and push down).
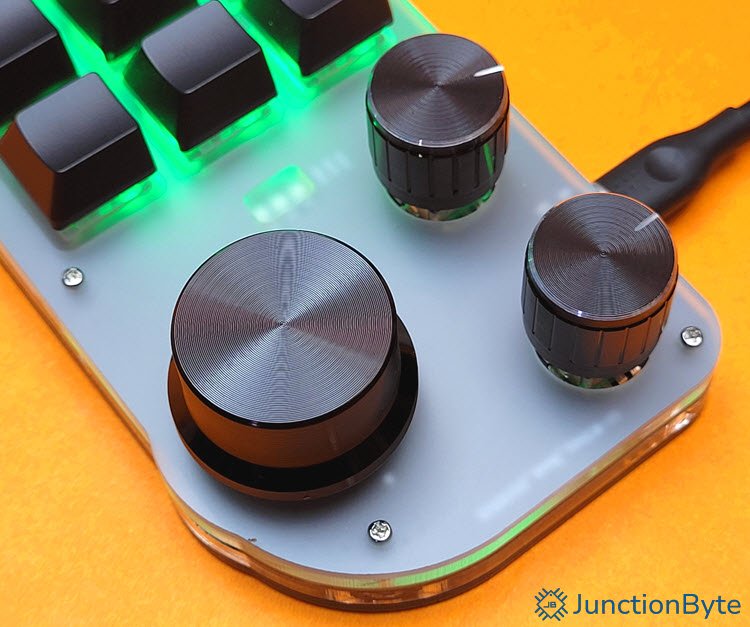
While the bottom knob is slightly larger than the other two, the hardware beneath all the three dials is identical. The advantage of a larger knob is that you get a smoother rotation (due to bigger leverage). You can assign tasks such as zoom in/out or scrubbing through the timeline to the larger knob.
Layer Switch (Push Button)
One interesting feature of this Macro Keypad is “Layer” functionality. This mini keyboard supports 3 layers of operations (Layer 1, Layer 2, and Layer 3). What does this mean?
It essentially allows the 15 keys of the keyboard to act as 45 keys. You can assign three different functions to the same key by selecting the layers.
| Key 1 + Layer 1 | Function 1 |
| Key 1 + Layer 2 | Function 2 |
| Key 1 + Layer 3 | Function 3 |
The push button helps you switch between the layers. Not only the keys but even the rotary knobs are layer programmable. So, if the larger knob has a zoom in/out function in layer 1, you can assign it for volume +/- in layer 2, and some other function in layer 3.
BT Switch
Next is the slide switch. Using this switch, you can turn the Bluetooth ON or OFF. The macro keypad will appear as “MINI_KEYBOARD” in the Bluetooth devices menu of your computer (or mobile phone). There is no need to enter any pairing password.
Upon further inspection, I found out that this switch just disconnects the battery from the rest of the circuit. So, even when the switch is in its off position, the Bluetooth will turn on when you plug the cable.
Indicator LEDs
I talked about Layer Switch in the previous section. You might be wondering how you will know which layer you are on. There are three Blue LEDs in the center of the keyboard that will light up momentarily when you press the layer switch (one LED per layer).
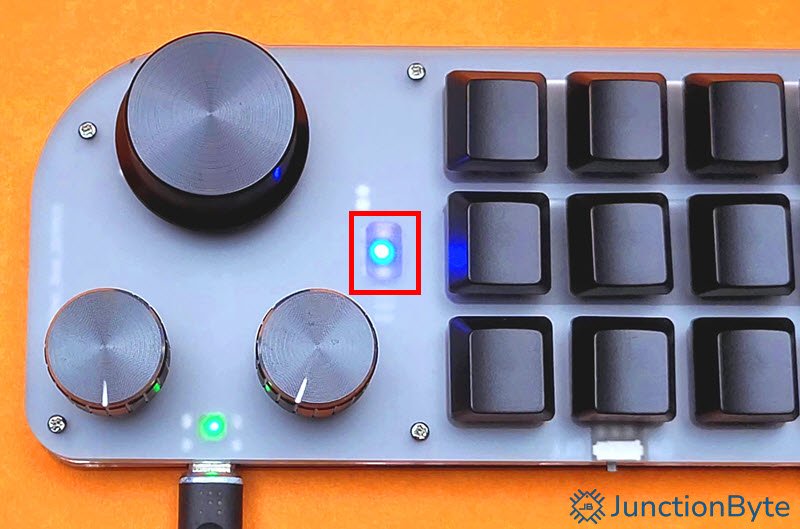
Sadly, these LEDs don’t stay ON. While the keyboard has the necessary hardware, you still don’t have a direct way to know the layer number. The developers can fix this by making the Layer LED ON (reduce the brightness using PWM so that it won’t be distracting). There is a workaround, which I will discuss later.
Battery
The Mini Keyboard comes with a built-in battery so that it works over Bluetooth without any cables. I will show the teardown images later but the battery is a tiny li-po pouch battery (smaller than a typical BL-5C battery). I couldn’t calculate the battery life but I’m fairly confident that you can run the keyboard for several days on battery power.
In Bluetooth mode, if you don’t press any key for 10 minutes, the keyboard goes into sleep state to save battery. You can wake the device by pressing any key.
To charge the battery, all you have to do is plug a USB-C cable to the USB-C Port on the keyboard. In addition to charging the battery, the USB-C Port also acts as a data transfer port when using the software or if you want to use the keypad in wired mode. So, make sure you use a USB-C Cable that supports data transfer (the cable that came in the package will do the job fine).
Apart from the layer indication LEDs, there is another bicolor LED near the USB-C Port. It indicates the status of battery charging (red means charging and green means fully charged).
RGB Backlight
As I mentioned before, this Mini Keyboard has per key RGB backlighting. You can customize the lighting through the software. It supports 6 LED Lighting Modes (Mode 0 through Mode 5) and here are their descriptions:
| Mode 0 | LEDs OFF |
| Mode 1 | All LEDs ON (Color Customizable) |
| Mode 2 | LED Sweep from First Key to Last Key (Color Customizable) |
| Mode 3 | LED Sweep from Last Key to First Key (Color Customizable) |
| Mode 4 | Individual Key Lights Up When Pressed (Color Customizable) |
| Mode 5 | All LEDs ON (While Color) |
In case of RGB Colors, you can choose between the following:
- Red
- Orange
- Yellow
- Green
- Cyan
- Blue
- Purple
There is no option for a per-key backlight customization. All you can do is assign the keys with the previously mentioned LED Modes and choose one color.
I said there is a workaround for the lack of stable layer indication LED. What you can do is assign different backlights to the keys for each layer. For example:
- Layer 1: LED Mode 1 (or LED Mode 4) – Red
- Layer 2: LED Mode 1 (or LED Mode 4) – Green
- Layer 3: LED Mode 1 (or LED Mode 4) – Blue
An important point about the RGB Backlighting is that it works only when you use the keyboard in wired mode. It doesn’t work in Bluetooth mode. This further improves the battery life.
There is a small issue with my Mini Keyboard with regards to the RGB Lighting (particularly in Modes 2, 3, and 4). In these modes, when I press a key, not only the corresponding LED but also a random LED turns on (not every time but just randomly). I am sure this is due to the daisy chain nature of the RGB LEDs as well as the data format sequence in the firmware.
Software
Now comes the important part: the software that helps us customize the keys and knobs. I’ll provide a link to download the software (it has support for Windows as well as macOS). I don’t have a Mac, so I will talk only about the Windows software experience.
I scanned the software in multiple virus detection tools and it is safe to say that it is malware free. There is no need to install the software as all you have to do is extract the contents of the zip file and run the executable (“MINI_KEYBOARD.exe”).
Here’s what the UI of the software looks like. At the top, you can see a graphical representation of the Mini Keyboard (all its keys as well as the knobs).
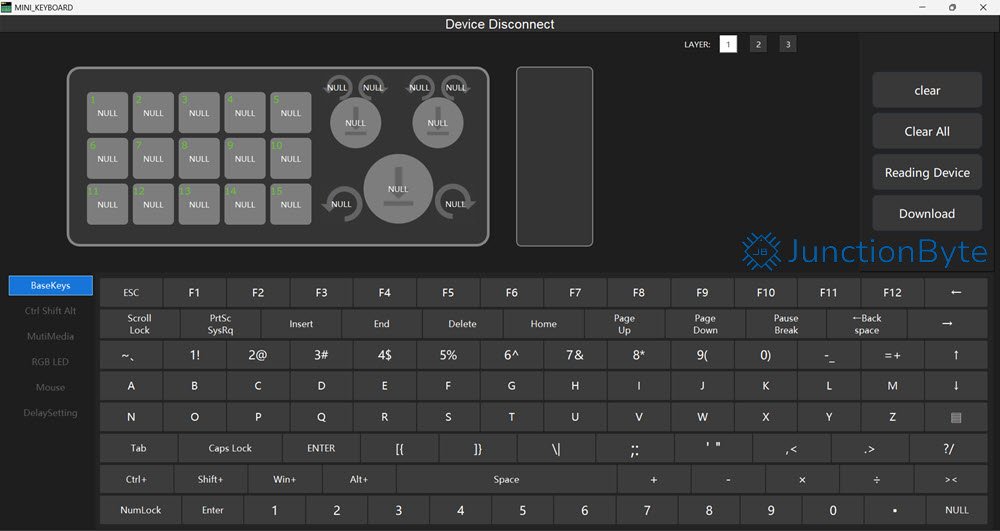
There are layer selection options on the top and just right to this, you can see the program (or Download) option. The Mini Keyboard stores the key configuration in its memory and you need to run the software only when customizing the keys or RGB Lighting.
How to Customize/Program the Mini Keyboard Keys?
If you focus on the bottom half of the UI, this is where all the customization happens. On the left, there is a menu of six items, each with its own functionality. For example, “BaseKeys” will allow you to set the regular alphanumeric keys, function keys, and modifier keys to the individual keys of the mini keyboard.
All you have to do is connect the keyboard to the computer using a USB-C Cable (the top of the software says “Device Connect”), select the “key” of the mini keyboard you want to configure, assign its functions, and click on the “Download” option. That’s it!
Here’s a brief description of the six menu items:
| BaseKey | All the basic keys (alphabets, number, function keys, symbols, etc.) |
| Ctrl Shift Alt | Modifier Keys as well as F13 to F24 |
| Multimedia | Volume, Brightness, Track, and other media related functions |
| RGB LED | RGB Modes and Colors |
| Mouse | All mouse clicks and scroll functions |
| Delay | Assign up to 6000 ms of delay (per key) |
There is a lot of customization in the software and you can spend a lot of time to assign different functions and options to all the keys and knobs in each layer.
Teardown
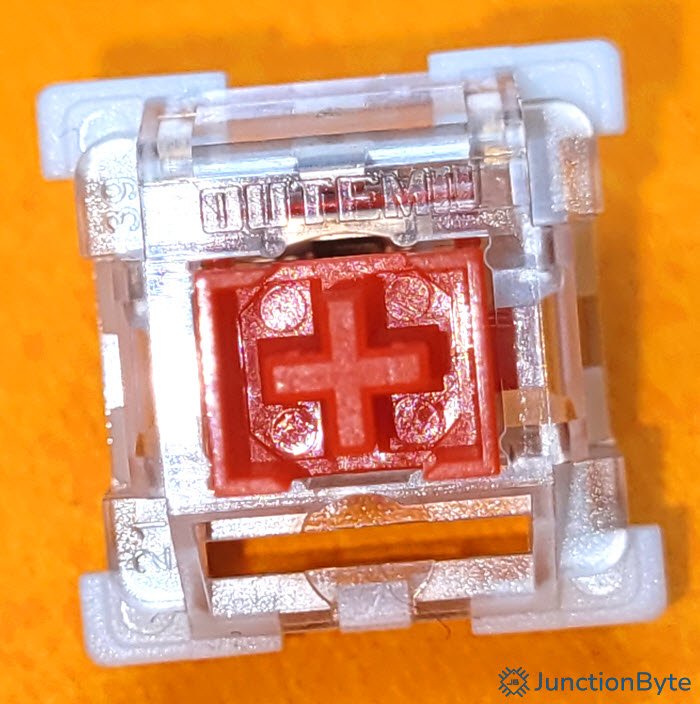
As a bonus, I completely disassembled the Mini Keyboard and here are my findings. It is very easy to remove the switches as they are hot swappable. Speaking of which, the switches are from a brand called “Outemu” and specifically, they are the Outemu Red Switches (which are linear switches). I am not a “mechanical keyboard” guy but I believe these are a low cost alternative to Cherry MX Red Switches.
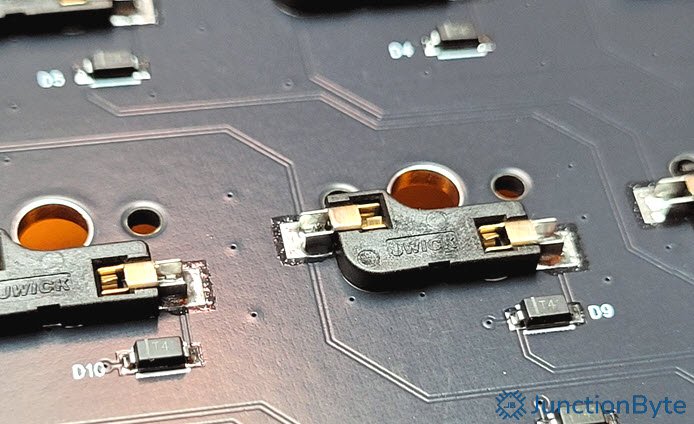
Coming to the PCB Hot Swap Socket, it is from a brand called “JWICK” and once again, I am not familiar with the reputation.
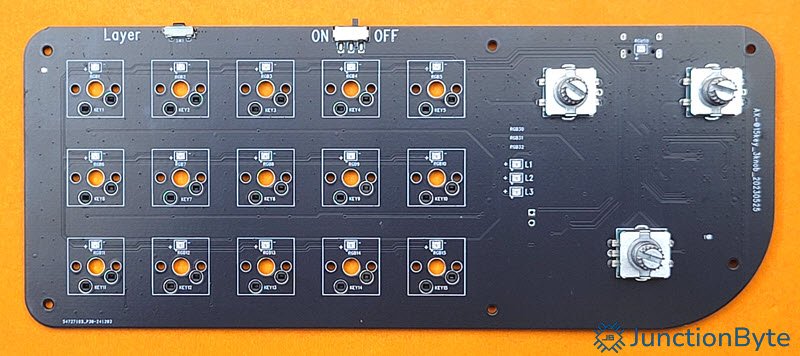
The main PCB is sandwiched between four pieces of acrylic and here are all the pieces.

As far as the main PCB is concerned, the layout is pretty clean but the soldering job is messy (flux residue all over the board). The top of the PCB has the RGB LEDs (in a daisy chain fashion), the rotary encoders, layer selection switch, and BT ON/OFF switch. Observing the hole cutouts of the switches, I think you can fit both three pin switches as well as five pin switches.
If you look at the bottom of the PCB, there are the hot swap sockets, the USB-C Port, the main MCU, li-po battery, and some passive components. You can also see the PCB Antenna near the MCU. Speaking of MCU, the name on the top of the IC is etched away and I couldn’t find any info on the make and model of the microcontroller.
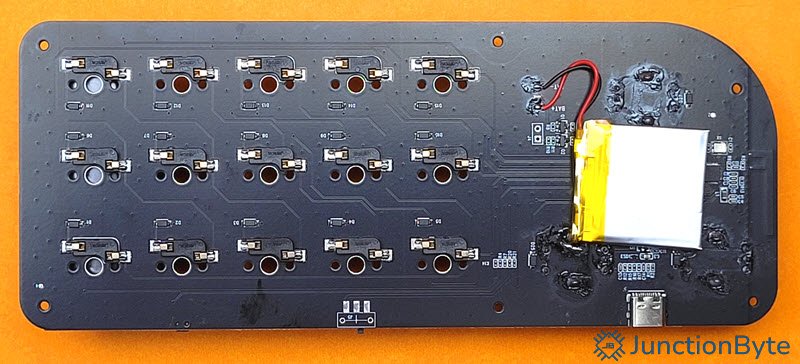
There is nothing else worth mentioning on the PCB.
Price
I bought this Mini Keyboard for ₹3,500 (about $40) including shipping from Banggood. Yes, the price is a little bit high but if you have access to Aliexpress (or other similar sites), then you can get it for slightly less (about $30 or so).
Is it worthy? Considering the build quality, functionality, and customization it offers, I feel that this Macro Pad is definitely a worthy investment, especially if you are a creative professional.
Conclusion
Overall, the Mini Keyboard (Macro Keypad or simply Macro Pad) is an interesting little device. With its 15 Mechanical Switches and 3 Rotary Dials, you can make things easy by assigning shortcuts, frequently-used strings (up to 18 characters), multimedia functions, and many more.
The software is simple yet functional. It allows for easily programming the keys and knobs. You can set different RGB Backlight Modes and Colors as well.
Apart from software-level customization, the macro keypad comes with hardware customization in the form of hot swappable switches.
You will need some time to adjust to the layout and memorize the functions of the keys, but it is a quick learning process. A positive addition to your workspace.