The STM32CubeIDE is a very useful tool, especially if you work with STM32 MCUs exclusively. It will help you create the project at the microcontroller level (configure Pins, set the clock), generate a skeleton code, upload the code, and even debug the MCU. What if you are working on microcontrollers from different manufacturers? Or, what if you want to switch between ‘Arduino’ environment and ‘STM32Cube’ environment? The obvious solution is to install all the necessary software development tools and juggle between them. However, there is an easy solution in the form of PlatformIO.
In this guide, we will look at the basics of PlatformIO (installation, features, etc.) and learn how to program STM32G4 in PlatformIO. This guide is a continuation to the previous ‘STM32G4’ guides where we worked with Arduino IDE and STM32CubeIDE.
If you are a beginner, I would strongly recommend you go through the ‘Introduction to STM32G4 with Arduino IDE’ and ‘Getting Started with STM32CubeIDE and STM32G4’ guide. You will learn a lot of essentials with respect to the STM32G4 MCU and the tools.
Introduction to PlatformIO
PlatformIO is a free, open-source extension for Visual Studio Code (VS Code) for embedded C/C++ development. VS Code is one of the most popular software development tools out there.
One of the main problems that many embedded software developers (at least beginners) face is setting up the development environment (toolchains, IDEs, drivers or libraries, etc.) as most of them are vendor (manufacturer) specific.
PlatformIO aims to simplify this process by taking the process of installing the dependencies away from the user. Moreover, it supports SDKs (Software Development Kits) for more than 40 embedded system platforms.
Apart from easily installing the SDKs, PlatformIO also supports debugging, unit testing, and many more useful features. Here’s a small list of popular platforms that are supported by PlatformIO:
| ESP32, ESP8266 | Nordic nRF52 | Intel MCS-51 (8051) |
| Atmel (now Microchip) AVR, SAM | TI MSP430 | SiFive |
| STM32, STM8 | Microchip PIC32 | Infineon XMC |
| Raspberrypi | NXP LPC, i.MX RT | Freescale Kinetis |
| Teensy | Renesas RA | Lattice iCE40 |
You will understand more about PlatformIO when I show the installation process and how to create projects.
How to Install PlatformIO?
As I mentioned before, PlatformIO IDE is a Visual Studio Code extension. So, in order to use PlatformIO, you need to first install VS Code on your computer (if you haven’t already). Thankfully, all the tools (Visual Studio Code, PlatformIO) are completely free.
NOTE: VS Code is the primary IDE for PlatformIO. However, you can also use PlatformIO with some other popular IDEs and Code Editors such as Atom, NetBeans, Eclipse, CodeBlocks, etc. We will focus on Visual Studio Code for this guide.
Open Visual Studio Code and click on the ‘Extensions’ tab on the left. You can also press the shortcut ‘Ctrl+Shift+X’ to open Extensions tab.
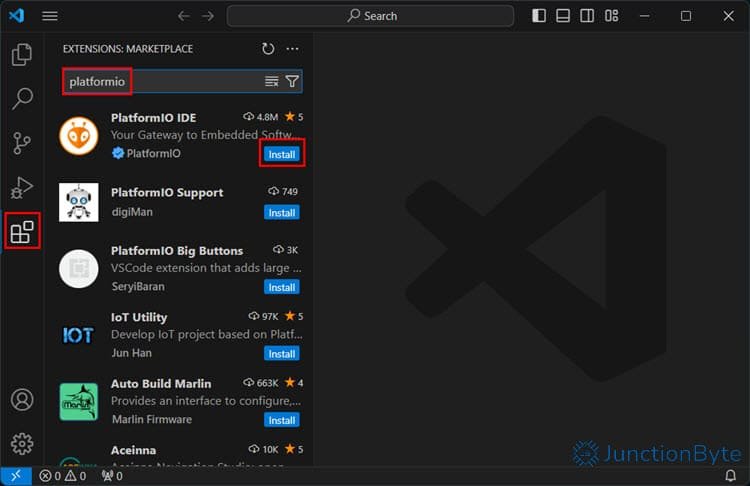
Search for ‘PlatformIO IDE’ in the search bar. The first result should be ‘PlatformIO IDE’ and you can click on the ‘Install’ button. It will take some time to install the extension and after that you have to restart the VS Code app.
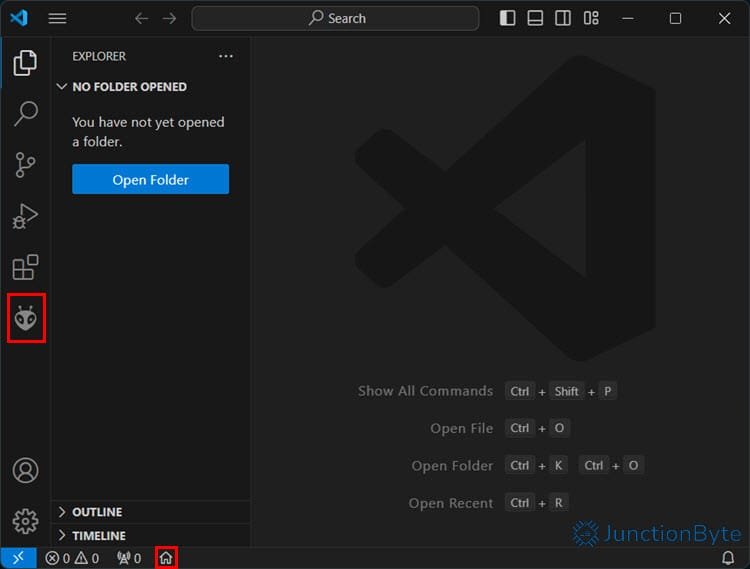
After VS Code restarts, you can see a new PlatformIO icon appear in the Activity Bar on the left side of VS Code.
This part completes only the installation of the PlatformIO IDE. We have to configure PlatformIO, which I will show in the next section.
Understanding Platforms and Frameworks in PlatformIO
In the context of PlatformIO, a ‘Platform’ is nothing but a microcontroller (or a microprocessor) architecture. For example, the popular Arduino UNO (the Revision 3) uses an Atmel’s AVR microcontroller (the ATmega328P). So, the ‘Platform’ would be Atmel AVR. Similarly, the ‘Platform’ for the STM32G431 Core Board that we are working on would be, you guessed it, ST STM32.
I already gave a list of some of the popular ‘Platforms’ that the PlatformIO supports.
So, depending on the hardware you are working on, you need to install appropriate ‘Platform’ in the PlatformIO IDE.
Another thing that you need to understand in PlatformIO is the ‘Framework.’ What is a Framework in PlatformIO? It is essentially the software development kit SDK that you can use to develop/write applications for a ‘Platform.’
Arduino is a popular framework. You can use the Arduino framework to develop applications for several platforms such as Atmel AVR (Arduino UNO R3), ESP32, ESP8266, STM32, etc.
Here’s a small list of some of the popular ‘Frameworks’ that the PlatformIO supports:
| Arduino | FreeRTOS |
| CMSIS | Mbed |
| ESP8266 Non-OS, RTOS | STM32Cube |
| Espressif IoT Development | Zephyr |
Remember that for a particular ‘Platform,’ you can develop applications using one or more ‘Frameworks’ (depending on the platform though). For instance, in case of STM32, you can use any of the following frameworks:
- Mbed
- CMSIS
- Standard Peripheral Library
- libopencm3
- Arduino
- STM32Cube
- Zephyr RTOS
How to Install Platforms in PlatformIO?
You can start creating projects at this point. But instead of that, I want to show you how to install a platform (STM32 in this case). When you install a Platform, PlatformIO will download and install all the supported frameworks, board packages, examples, and other important files.
In the Visual Studio Code, go to PlatformIO Home by clicking the PlatformIO Home Icon on the ‘Status Bar’ at the bottom. Familiarize yourself with the layout of PlatformIO IDE.
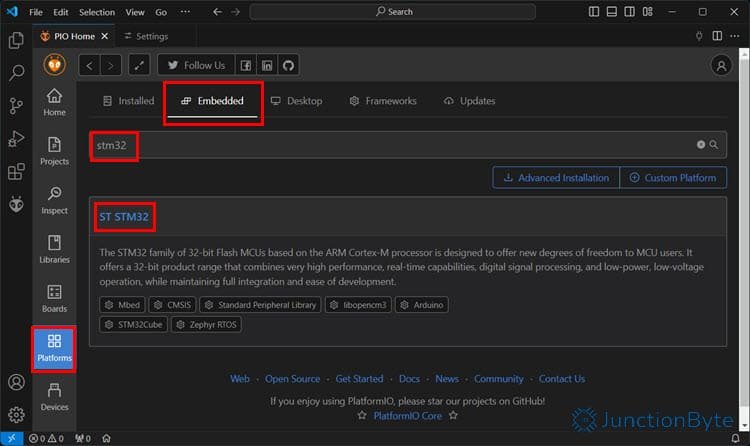
Click on the ‘Platforms’ tab and select the ‘Embedded’ option. Search for ‘STM32,’ click on the result, and then click on the ‘Install’ button. PlatformIO will now download and install the necessary files for this platform. Once it finishes the installation, you will get a pop-up message saying the same.
How to Create a Project in PlatformIO?
Go back to PlatformIO Home page and click on the ‘+ New Project’ option from the Quick Access shortcut (or go to Projects tab and click on ‘+ Create New Project’ option).
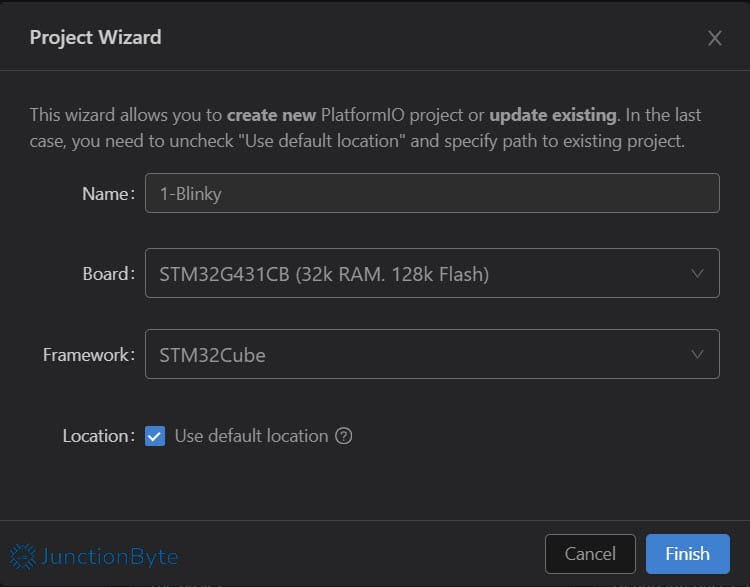
A ‘Project Wizard’ will pop-up. Give a proper project name (I gave it ‘1-Blinky’). Click on ‘Select a board,’ search for ‘STM32G4,’ and select the result ‘STM32G431CB.’
Coming to the Framework, I will be using ‘STM32Cube’ for this guide. You can leave the location at the default (or assign a specific folder of your choice). The default location in my case is ‘C:\Users\JunctionByte\Documents\PlatformIO\Projects.’ When you click on the ‘Finish’ button, PlatformIO will download the ‘STM32Cube’ SDK and create a project for you.
Sadly, when you use the ‘STM32Cube’ framework, you won’t get any source code (not even some basic skeleton code). You have to manually create all the source files (which are usually the .c and .h files). The only thing you get (at least that is directly useful for us) is the ‘platformio.ini’ file. We will first understand what this ‘platformio.ini’ file is and then look at a clever way to generate the starting code for our project (only useful when you are working with STM32 MCUs and STM32Cube framework).
What is platformio.ini File?
The ‘platformio.ini’ file in PlatformIO is a unique way to configure and set up the development environment. Every PlatformIO project must have a platformio.ini file (in the root directory). Take a look at the platformio.ini file that the IDE generated for this project
[env:genericSTM32G431CB]
platform = ststm32
board = genericSTM32G431CB
framework = stm32cube
Using the platformio.ini file, you can essentially use the same code with multiple platforms and/or platforms without creating additional projects or worrying about SDKs. Just configure the platformio.ini file as per your requirements and let the PlatformIO IDE do most of the hard work (at least in terms of toolchains, SDKs, build configs, etc.) while you focus on the actual application.
The online documentation of PlatformIO has a lot of interesting information about the platformio.ini file among other things. I’ll leave a link to the PlatformIO documentation and do check it out.
Source Code Generation for STM32Cube Framework
If you look at the structure of the project that PlatformIO created in the previous section, it has a bunch of folders (src, inc, etc.) but doesn’t have any actual source code files. This might not be the case for all the frameworks but true with the ‘STM32Cube’ framework. For instance, if you use the ‘Arduino’ framework, then PlatformIO will generate the skeleton ‘main.cpp’ file for you.
There are two solutions to this issue. First one is to manually create and populate all the ‘.c’ and ‘.h’ files in the respective folders. However, there is an easy way to do this using ‘STM32CubeMX,’ a code generation tool designed by STMicroelectronics specifically for STM32 MCUs.
STM32CubeMX to the Rescue
In the previous ‘Getting Started with STM32CubeIDE’ guide, we saw how to configure a microcontroller from scratch and generate a basic starting code. This job is actually performed by the STM32CubeMX tool, which is integrated into the STM32CubeIDE.
You can also use the standalone STM32CubeMX application to do the same job (i.e., configure MCU, initialize pins, set up the clock tree, and generate the code). We are going to do the same now.
First step would be to download and install the STM32CubeMX software. As usual, go to the ST’s official website, login using your credentials, download the tool, extract the zip file, and run the executable. It is a simple process.
After installation, open the Stm32CubeMX app. Depending on whether you have already installed the STM32CubeIDE or not, some of the following steps will vary. In case you already installed STM32CubeIDE, the STM32CubeMX will automatically pull the credentials and software packages that were a part of the STM32CubeIDE. You can go ahead and start creating a new project.
However, if this is your first ‘STM32Cube’ application, login with your ST credentials (myST -> Login). Then click on Help -> Manage embedded software packages and a new window will pop-up.
Look for the correct STM32Cube Package in the list. Since I am working on the STM32G431CBU6 MCU, I would need the STM32G4 Package. After finding the appropriate package, expand it, select the latest version, and click on the ‘Install’ button. The tools will now download and install the package on your computer.
NOTE: The annoying part is we won’t be using these package files in our PlatformIO project (as PlatformIO already has downloaded its own version and uses it in the project). But this process is necessary for STM32CubeMX to work.
Generate Code using STM32CubeMX for PlatformIO
Let us now generate some code. Click on the ‘ACCESS TO MCU SELECTOR’ under ‘Start My project from MCU’ or click File -> New Project.
If you followed my previous guide on STM32CubeIDE (which I totally recommend, if you didn’t), there I clearly mentioned what we are about to do. But here we go once again.
Search for ‘STM32G431CBU6’ next to the ‘Commercial Part Number’ field. From the results on the right side bottom, select ‘STM32G431CBU6’ and then click on ‘Start Project’ on the top.

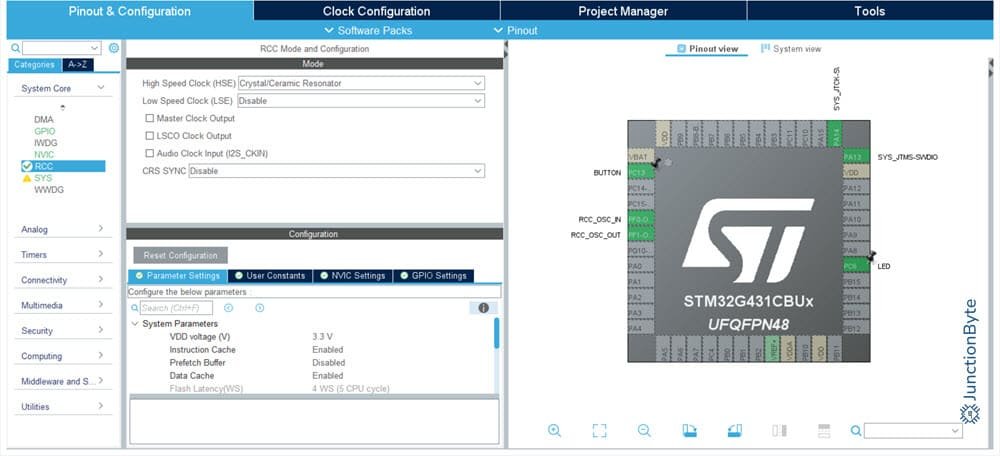
Here are the important things we need to do for this project using an LED (PC6) and a Button (PC13):
- Click on ‘PC6’ in the ‘Pinout view’ and set it as ‘GPIO_Output.’ Right click on PC6, select ‘Enter User Label,’ and enter ‘LED.’
- Similarly for the button. Click on ‘PC13’ and set it as ‘GPIO_Input.’ Give it a user label ‘BUTTON.’
- Expand ‘System Core’ in the left side menu, select ‘GPIO,’ highlight ‘PC13,’ and set the ‘GPIO Pull-up/Pull-down’ to ‘Pull-down.’
- In the ‘System Core,’ select ‘SYS’ and set ‘Debug’ to ‘Serial Wire.’
- Select ‘RCC’ in the ‘System Core’ and set ‘High Speed Clock (HSE)’ to ‘Crystal/Ceramic Resonator.’
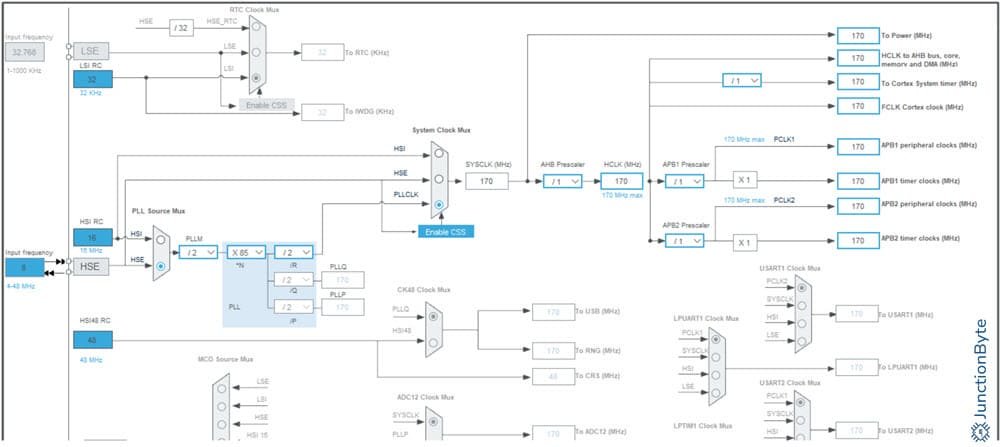
This completes the basic pin configuration. Move to the ‘Clock Configuration’ tab and set ‘HCLK’ to 170 Mhz. It will automatically adjust the parameters.
Change ‘PLL Source Mux’ to ‘HSE’ and ‘PLLM’ to ‘/2.’ This will complete the clock configuration.
Select the ‘Project Manager’ tab and give the project the same name you gave for PlatformIO project (1-Blinky). Give the ‘Project Location’ the same as the PlatformIO Project (C:\Users\JunctionByte\Documents\PlatformIO\Projects), set the ‘Application Structure’ to ‘Basic,’ and ‘Toolchain/IDE’ to ‘Makefile.’
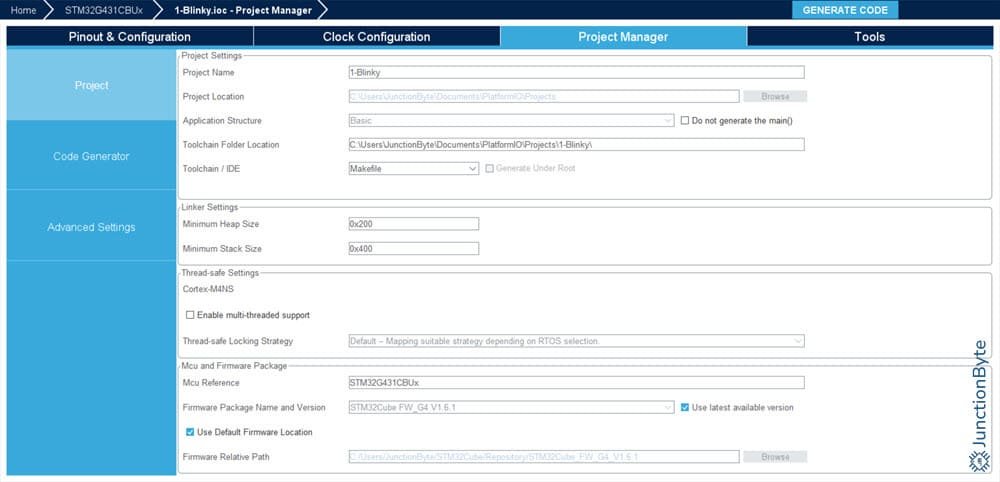
In the ‘Code Generator’ tab, set ‘Add necessary library files as reference in the toolchain project configuration file.’ You can leave the rest of the options at their default values and then click on ‘GENERATE CODE’ on the top right.
STM32G4 Blinky in PlatformIO
If you open the PlatformIO IDE (in VS Code), you can see the ‘src’ and ‘inc’ folders populated with the code generated by STM32CubeMX.
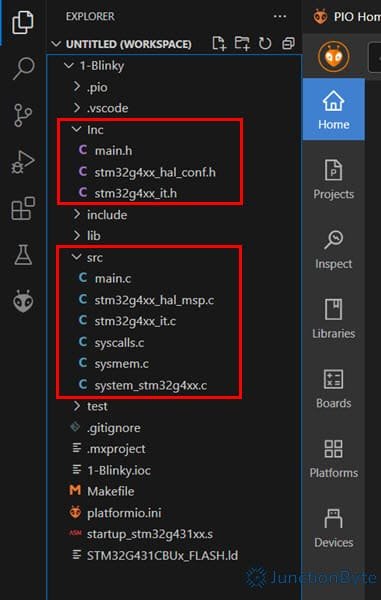
With this skeleton code, we are now ready to develop our first application for the WeAct Studio STM32G431 Core Board. It is just a Blinky project where the LED normally blinks every second (1 sec ON, 1 sec OFF) but if you press and hold the button, it blinks rapidly (200 ms ON, 200 ms OFF).
Here’s the code for your reference:
#include "main.h"

uint32_t currentTick, prevTick;
uint32_t normalDelay = 1000;
uint32_t buttonDelay = 100;

void SystemClock_Config(void);
static void MX_GPIO_Init(void);

int main(void)
{
  HAL_Init();
  SystemClock_Config();
  MX_GPIO_Init();

  currentTick = HAL_GetTick();
  prevTick = HAL_GetTick();

  while (1)
  {
    currentTick = HAL_GetTick();
      if(HAL_GPIO_ReadPin(BUTTON_GPIO_Port, BUTTON_Pin) == 1U)
      {
          if(currentTick - prevTick >= buttonDelay)
          {
              prevTick = currentTick;
              HAL_GPIO_TogglePin(LED_GPIO_Port, LED_Pin);
          }
      }
      else
      {
          if(currentTick - prevTick >= normalDelay)
          {
                prevTick = currentTick;
                HAL_GPIO_TogglePin(LED_GPIO_Port, LED_Pin);
          }
      }
  }
}


void SystemClock_Config(void)
{
  RCC_OscInitTypeDef RCC_OscInitStruct = {0};
  RCC_ClkInitTypeDef RCC_ClkInitStruct = {0};

  HAL_PWREx_ControlVoltageScaling(PWR_REGULATOR_VOLTAGE_SCALE1_BOOST);

  RCC_OscInitStruct.OscillatorType = RCC_OSCILLATORTYPE_HSE;
  RCC_OscInitStruct.HSEState = RCC_HSE_ON;
  RCC_OscInitStruct.PLL.PLLState = RCC_PLL_ON;
  RCC_OscInitStruct.PLL.PLLSource = RCC_PLLSOURCE_HSE;
  RCC_OscInitStruct.PLL.PLLM = RCC_PLLM_DIV2;
  RCC_OscInitStruct.PLL.PLLN = 85;
  RCC_OscInitStruct.PLL.PLLP = RCC_PLLP_DIV2;
  RCC_OscInitStruct.PLL.PLLQ = RCC_PLLQ_DIV2;
  RCC_OscInitStruct.PLL.PLLR = RCC_PLLR_DIV2;
  if (HAL_RCC_OscConfig(&RCC_OscInitStruct) != HAL_OK)
  {
    Error_Handler();
  }

  RCC_ClkInitStruct.ClockType = RCC_CLOCKTYPE_HCLK|RCC_CLOCKTYPE_SYSCLK
                              |RCC_CLOCKTYPE_PCLK1|RCC_CLOCKTYPE_PCLK2;
  RCC_ClkInitStruct.SYSCLKSource = RCC_SYSCLKSOURCE_PLLCLK;
  RCC_ClkInitStruct.AHBCLKDivider = RCC_SYSCLK_DIV1;
  RCC_ClkInitStruct.APB1CLKDivider = RCC_HCLK_DIV1;
  RCC_ClkInitStruct.APB2CLKDivider = RCC_HCLK_DIV1;

  if (HAL_RCC_ClockConfig(&RCC_ClkInitStruct, FLASH_LATENCY_4) != HAL_OK)
  {
    Error_Handler();
  }
}

static void MX_GPIO_Init(void)
{
  GPIO_InitTypeDef GPIO_InitStruct = {0};

  __HAL_RCC_GPIOC_CLK_ENABLE();
  __HAL_RCC_GPIOF_CLK_ENABLE();
  __HAL_RCC_GPIOA_CLK_ENABLE();

  HAL_GPIO_WritePin(LED_GPIO_Port, LED_Pin, GPIO_PIN_RESET);

  GPIO_InitStruct.Pin = BUTTON_Pin;
  GPIO_InitStruct.Mode = GPIO_MODE_INPUT;
  GPIO_InitStruct.Pull = GPIO_PULLDOWN;
  HAL_GPIO_Init(BUTTON_GPIO_Port, &GPIO_InitStruct);

  GPIO_InitStruct.Pin = LED_Pin;
  GPIO_InitStruct.Mode = GPIO_MODE_OUTPUT_PP;
  GPIO_InitStruct.Pull = GPIO_NOPULL;
  GPIO_InitStruct.Speed = GPIO_SPEED_FREQ_LOW;
  HAL_GPIO_Init(LED_GPIO_Port, &GPIO_InitStruct);

}

void Error_Handler(void)
{
  __disable_irq();
  while (1)
  {
  }
}

#ifdef  USE_FULL_ASSERT

void assert_failed(uint8_t *file, uint32_t line)
{

}
#endif
This code is identical to the code in the previous ‘Getting Started with STM32CubeIDE and STM32G4’ guide. Only difference is the IDE.
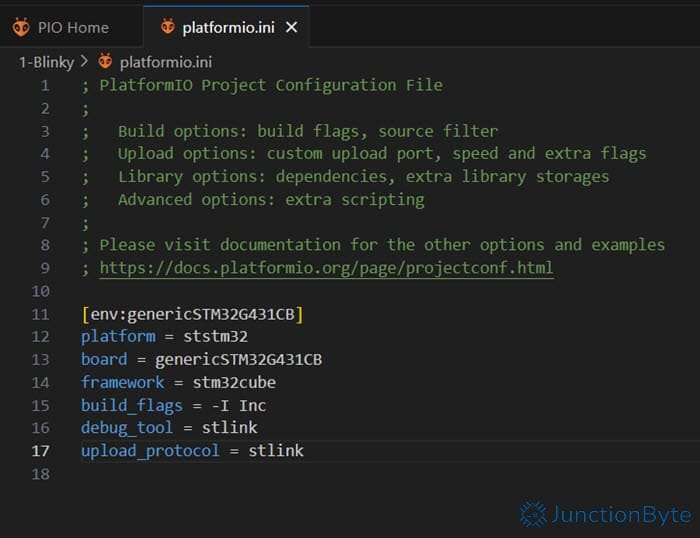
If you observe the ‘main.c’ file, there is an error with respect to the ‘main.h’ file. The trick here is to include the ‘inc’ folder for compilation. So, how do we do that? We have to make some changes to the ‘platformio.ini’ file.
Here’s all the contents of the ‘platformio.ini’ file for this project:
[env:genericSTM32G431CB]

platform = ststm32

board = genericSTM32G431CB

framework = stm32cube

build_flags = -I Inc

debug_tool = stlink

upload_protocol = stlink
Upload Code to STM32G431 Core Board using PlatformIO
It is time to upload the code. But before that, you can compile (or build) the code and see if there are any errors. To do this, click on the ‘✔’ icon on the button status bar (or the one in the top right corner).
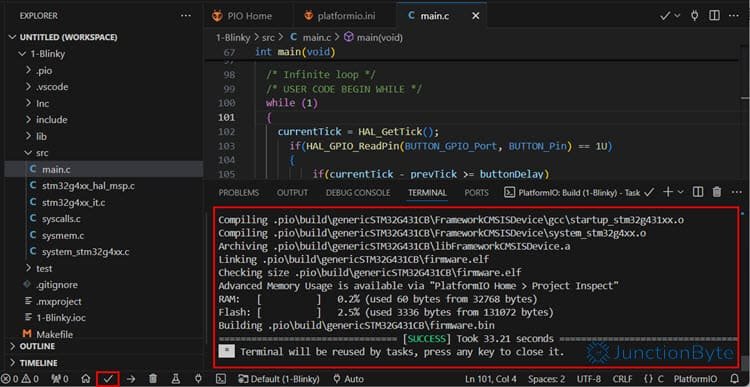
If everything goes well, the code should compile without any errors. You can also see the IDE generated some binary files (‘firmware.bin’ and ‘firmware.elf’) after compilation.
Since we mention ‘ST-LINK’ as the upload method, you need to connect the WeACt Studio STM32G431 Core Board to a ST-LINK programmer and debugger as per the following:
| STM32G431 Core Board | ST-LINK |
| GND | GND |
| SWCLK | SWCLK |
| SWDIO | SWDIO |
| 3.3V | 3.3V |
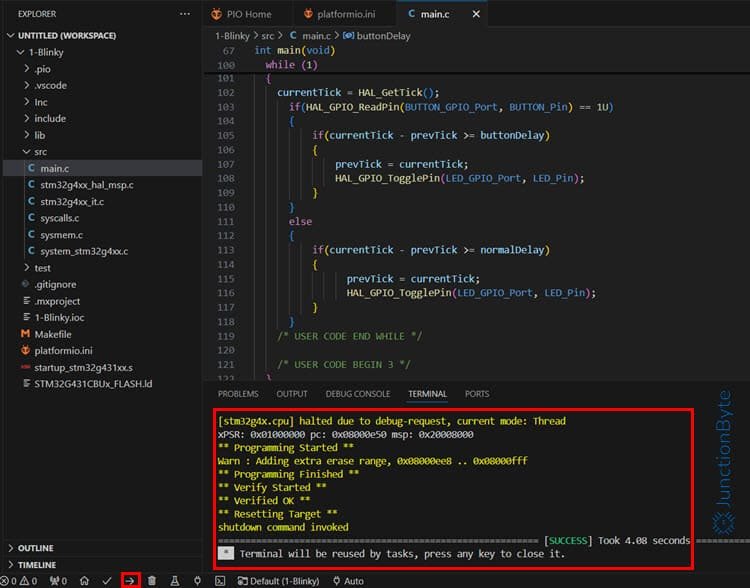
You don’t need any USB-C cable as the ST-LINK will provide the power to the STM32G431 Core Board. After making the connections, click on the ‘➡’ icon from the bottom status bar.
PlatformIO IDE will download some additional debugging tools (OpenOCD, DFU Util, etc.) and will automatically program the target microcontroller.
If you don’t have ST-LINK, you can use the binary files from the previous step and upload them using the STM32CubeProgrammer application (details in the earlier guide, ‘Getting Started with STM32CubeIDE’).
Conclusion
This is an introductory guide on PlatformIO for STM32G4 MCUs. In this guide, we saw how to install and configure PlatformIO IDE in Visual Studio Code, how to generate code for STM32 MCUs using STM32CubeMX tool, and how to Program STM32G4 in PlatformIO.
As this is essentially a getting started with PlatformIO and STM32G4, I did not cover some advanced topics such as debugging (yes, you can debug STM32 MCUs very easily in PlatformIO with the right hardware).
Wow. This is very well written and presented. Worked flawlessly.
Glad it worked.