Android Auto is one of those features that has become an integral part of my car usage. My daily commute is around 45 km and even with a highly familiar route to the office (or back to home in the evening), I use Android Auto to access Google Maps and sometimes, Spotify. I have a 2017 Hyundai i20. Like most cars from that period, my car came with wired Android Auto (and CarPlay as well, but we’ll focus on Android Auto). After years of using a single cable to connect my phone to the car, it recently started to cause connectivity problems. This got me thinking about Wireless Android Auto.
After some basic research, I stumbled across two solutions: one is a DIY Wireless Android Auto Adapter and the other is to just buy a Wireless Android Auto Dongle. I went with both the solutions.
In this write-up, I would like to share my experiences of making a Wireless Android Auto Dongle using a Raspberry Pi. I will explain all the hardware you need to get, software you need to download, and all the essential steps on how to make a Wireless Android Auto Adapter for your car.
If you are interested in more of a ready-made solution, I will talk about an affordable Wireless Android Auto Adapter that I bought. Surprisingly, both these options came at a very similar price tag (we will discuss that as well).
Introduction
The first thing I do when I get in my car is connect my smartphone to the car and access Android Auto. I’m sure most of you are like me. Many cars nowadays are featuring Wireless Android Auto. You don’t need cables or anything. When you combine this with Wireless Charging Pads inside the car, you can experience true wireless communication without worrying about charging.
However, things are not so easy for slightly older cars. Yes, cars came with Android Auto out of the factory. But you had to use a USB cable to connect your phone to the car’s head unit.
If the cable goes missing or if it gets damaged (which is what I faced), you cannot access Android Auto.
While Wireless Android Auto is a lot more convenient, there are some potential issues as well (with respect to battery life and overheating of the smartphone).
‘WirelessAndroidAutoDongle’ GitHub Repo
Let us start with the DIY method. When I was looking to make my own Wireless Android Auto Adapter, I quickly realised that there were not too many options available.
I found a GitHub repository by the name ‘WirelessAndroidAutoDongle’ from user ‘nisargjhaveri.’ After going through the repository for a while, I decided to use this to make a Wireless Android Auto Adapter.
Hardware Needed for DIY Wireless Android Auto Dongle
As per the documentation in the GitHub repo, it supports the following Raspberry Pi Boards:
- Raspberry Pi Zero W
- Raspberry Pi Zero 2 W
- Raspberry Pi 3 A+ (Not Raspberry Pi 3 B+)
- Raspberry Pi 4
The main requirement here is: support of USB OTG, built-in Bluetooth and Wi-Fi (external adapters also work fine), and can be powered directly from the car’s USB Port.
On the car side of things, make sure that your car’s head unit supports Android Auto. This project is just a workaround to make things wireless. It doesn’t magically bring Android Auto capability on the head unit, if it doesn’t have one.
I have all these Raspberry Pi Boards, but decided to use the Raspberry Pi Zero 2 W due to the formfactor (and it has a better SoC than the Raspberry Pi Zero W).
Here’s the final list of things you need to implement this project:
- Raspberry Pi Zero 2 W
- Micro SD Card (16 GB, technically any size is fine)
- USB to micro-USB Cable that supports Data Transfer
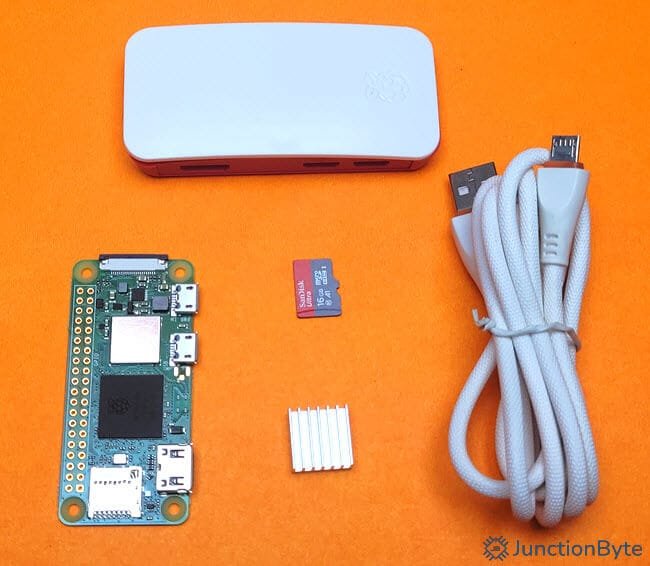
Additionally, you might want to get the following to improve the overall aesthetics (and even performance):
- Raspberry Pi Zero 2 W Case
- Heat Sink (for SoC)
- USB to micro-USB Adapter (Male to Male)
Download the Image File
The first step is to download the appropriate image file depending on the type of Raspberry Pi Board you are using. Officially, there are four releases from the developer for the four boards that I mentioned previously.
Sad part is that these releases stopped in the year 2021 (latest release was from Aug, 2021). Good thing is you can build your own image file using the source code in the repo. The developer has created a small set of instructions on how to build the image file yourself. If you fancy building the image yourself, you could try that. For the sake of this project, I’ll stick to the pre-built image.
The following table lists out the image file you need to download for different types of Raspberry Pi Boards:
| Raspberry Pi Board | Image File |
| Raspberry Pi Zero W | raspberrypi0w-sdcard.img.xz |
| Raspberry Pi Zero 2 W | raspberrypizero2w-sdcard.img.xz |
| Raspberry Pi 3A+ | raspberrypi3a-sdcard.img.xz |
| Raspberry Pi 4 | raspberrypi4-sdcard.img.xz |
If you look at the file sizes, they are pretty small (31 – 33 MB). That is why I said the size of the microSD card doesn’t matter. Even if you have a small 1 GB or 2 GB microSD Card, it won’t be a problem.
Prepare the microSD Card
Next step is to flash the microSD with the image file that we downloaded. For this, we need to use a special flasher application. Balena Etcher is a decent app. Since we are working with Raspberry Pi boards, we can use the ‘Raspberry Pi Imager’ for this project.
Download this application and install it on your computer. After installation, open the Imager app.
In the ‘Raspberry Pi Imager’ app, you will need to set three options:
- Raspberry Pi Device
- Operating System
- Storage

Click on ‘CHOOSE DEVICE’ under the ‘Raspberry Pi Device’ and select the Raspberry Pi Board you are using. In my case, it is the Raspberry Pi Zero 2 W.
Now, click on ‘CHOOSE OS’ under the ‘Operating System’ option, scroll down, and, select ‘Use custom’ option. Navigate to the location where you downloaded the image file (from the previous section) and select the ‘.xz’ file.
If you haven’t connected the microSD Card to the computer, it is now time to do that. WARNING: All the data on the microSD Card will be erased. So, backup the data, if necessary.
Click on ‘CHOOSE STORAGE’ under the ‘Storage’ option and select the microSD Card you connected.
After making all the three choices, you can click on the ‘NEXT’ button. A warning will pop-up. Once the imager app finishes flashing the microSD Card, you can remove it from the computer.
DIY Wireless Android Auto Adapter
Insert the microSD Card into the slot on the Raspberry Pi Zero 2 W Board. Start the car, connect your phone to the car’s head unit, and launch Android Auto on the car (like you normally do).
Disconnect the phone now it is time to connect the Raspberry Pi Zero 2 W Board to the car.
If you look at the Raspberry Pi Zero 2 W, it has two micro-USB ports; one with label ‘PWR’ and the other with ‘USB’ label. The one with the ‘USB’ label supports USB OTG function (or in the world of Raspberry Pis, Gadget Mode). This is what we need.

Use this port on the Raspberry Pi Zero 2 W and connect it to the car using a good quality USB to micro-USB Cable that supports data transfer. The Raspberry Pi Zero 2 W boots up and during this time, the on-board green LED flashes. Make sure to turn on both Bluetooth and Wi-Fi on your phone.
Once the LED stabilizes, look for a new Bluetooth device in your phone’s Bluetooth Settings. In my case, the Bluetooth name of the device (Raspberry Pi Zero 2 W) was ‘AA Wireless Dongle.’
Pair your phone with this device. Once the phone connects to the Bluetooth device, the phone will automatically connect to the Wi-Fi from the Raspberry Pi Zero 2 W and you should see the Android Auto screen on your car’s display.
From the next time onwards, the Raspberry Pi Zero 2 W should automatically connect to the phone and start Android Auto. You need to turn on both Bluetooth and Wi-Fi on your smartphone.
Readymade Wireless Android Auto Adapter
While researching for a DIY Wireless Android Auto Adapter, I started looking for a more simple solution in the form of a dongle that we can buy and use as a plug-and-play device.
I bought this no-name, no-brand Wireless Android Auto Adapter from Banggood for about ₹2,000 (about $23) including shipping. I was skeptical when I made the payment but after receiving it and using the adapter for more than 2 weeks, I am extremely happy that it worked fine.

The package contains the main Adapter unit, a user manual, and a USB Type-C to Type-A Adapter.
The setup process was almost identical. Plug the adapter into the car’s USB Port, pair the Bluetooth device, and it will automatically connect over Wi-Fi and start Android Auto. Very simple.
Wireless Android Auto Adapter: DIY or Buy
Now the important question, should you make your own Wireless Android Auto Adapter or buy an off the shelf, ready-to-use dongle
Cost
Let me start with the price of both the solutions. Here’s a breakdown of the price that I had to pay for the DIY Wireless Android Auto Adapter using Raspberry Pi Zero 2 W board:
- Raspberry Pi Zero 2 W Board: ₹1,500 ($17)
- 16 GB microSD Card: Already Had One (32GB ₹399 or $4.7)
- USB to microUSB Cable/Adapter: Already Had One (₹100 or $1.2)
- Raspberry Pi Zero 2 W Case: ₹125 ($1.5)
- Heat Sink: ₹15 ($0.2)
The total cost of the DIY Wireless Android Auto Dongle was around ₹2,140 ($25). Let us now compare this with the readymade option.
As I already mentioned, I paid around ₹2,000 (or $23) for the plug-and-play Wireless Android Adapter Dongle. If you have access to AliExpress (or other similar sites), then you can get such adapters for way less than this. I saw some adapters being sold for less than $10.
Make Your Own vs. Plug-and-Play
With Raspberry Pi Boards, you need to spend some time downloading the necessary software, preparing the microSD Card, etc. All in all, it takes less than 10-minutes to convert a Raspberry Pi Zero 2 W (or other similar board) into a Wireless Android Auto Adapter.
In the case of the ready-made dongle, you don’t need to do anything. Just plug the device into your car’s USB port and start enjoying Wireless Android Auto.
Performance
Both the plug-and-play Wireless Android Auto Dongle and the DIY Adapter using Raspberry Pi Zero 2 W performed well. I used both the devices for two weeks each and during that period, neither one of them gave any problems. All the steering wheel controls worked as expected. The voice commands also worked fine.

With the DIY Wireless Android Auto Adapter, I noticed a minor lag when switching from small-sized Google Maps to full screen maps. But it is not a severe problem or a distraction.
After an hour of using the DIY Wireless Android Auto Adapter, the SoC on the Raspberry Pi Zero 2 W became slightly warm but not too hot. This is fine. However, if you often take long trips regularly, I would recommend installing a small heatsink on the SoC.
There were no heating or other issues with the readymade Wireless Android Auto Adapter that I have noticed.
Verdict
So, which Wireless Android Auto Adapter do I recommend, DIY or Buy? As you saw from these previous sections, the price and performance of both the options were very similar.
If you can get the readymade Wireless Android Auto Adapter for less than $15, then it is definitely a simpler and cleaner solution.
Even if both the options are costing the same, I would still recommend the plug-and-play adapter over the DIY version.
The only way that the DIY Wireless Android Auto Adapter makes sense is if you already have all the necessary hardware (or most of it, especially the main Raspberry Pi Board) just lying around. You could spend 10 – 15 minutes of your time and make a Wireless Android Auto Adapter.
Pros and Cons of Wireless Android Auto Adapter
Simplicity and convenience is one the main pros of a Wireless Android Auto Adapter (DIY or readymade). You need not worry about USB Cables. Just turn on Bluetooth and Wi-Fi on your smartphone and Android Auto will appear on the car’s head unit display.
But there are some problems as well. First of all, you need to turn on Bluetooth, Wi-Fi, Mobile Data, and GPS on your smartphone. The Wireless Android Auto Adapter (DIY or plug-and-play) will start the pairing process with Bluetooth and then switch over to Wi-Fi to maintain the connection. The car’s head unit still connects to the phone via Bluetooth.
This will definitely take a toll on the phone’s battery. If your car doesn’t have built-in wireless Android Auto, chances are it won’t have a wireless charging pad either. So, you will still need to plug the phone to charge it (especially if it is a long trip).
The benefit of wired Android Auto is that the USB cable keeps charging the phone, albeit slowly. You will lose this feature.
Since all the wireless modules on your phone are turned on, it becomes considerably hot. Here’s my Samsung S20 FE 5G after 1-hour of using it with a Wireless Android Auto Adapter.
I never had heating or battery problems when I connected my phone using a USB Cable.
Conclusion
This was a simple project on how to make a Wireless Android Auto Dongle for your car. Here, I talked about all the necessary steps you need to follow to make a very useful Wireless Android Auto Adapter using Raspberry Pi Zero 2 W Board.
Additionally, I also compared it with a similarly-priced readymade Wireless Android Auto Adapter that you can just buy and use.
If you have any questions, queries, or doubts, do let me know in the comments section.