I have been using 18650 lithium ion batteries (both professionally and personally) for more than 8 years now. Thanks to the nature of my work, I often have several high quality 18650s at my disposal and I have been using them in many DIY projects (mostly battery banks and UPS). Recently, one of my cousins asked me to build a power bank to charge their mobile phones while travelling. Initially, I thought of using one of those fast-charging power bank modules and designing a 3D printed case around it. But the overall cost became too high where buying a power bank made more sense.
But I wanted to make use of the 18650 batteries that I have laying around and started looking for some DIY Power Bank Cases. Most of them are basic cases that can hold several 18650s but the main drawback is they all lack the fast charging feature (both for charging the mobile phones as well as charging the batteries).
After some more digging, I came across an interesting DIY Power Bank Case that can house up to 6 18650 lithium batteries and importantly, supports bi-directional fast charging. It is the HAWEEL DIY 6 x 18650 Battery 24W Fast Charge Power Bank Box Case with Display.
I have been using this power bank case for almost two months now and wanted to share my experiences here. This review should be helpful to anyone who has a bunch of 18650 batteries and is looking to build their own power bank that supports fast charging.
NOTE: The product contains only the power bank case and doesn’t include batteries.
Rant on Lithium Pouch Cells
I love 18650 lithium ion batteries. They are cheaper, relatively safer, and the important one: you can easily replace one (if you know what you are doing). Sadly, the trend nowadays is to design every rechargeable lithium battery as a “pouch.”
Almost all modern laptops have multiple lithium polymer pouch cells. Even power banks are using the li-po pouch batteries. Yes, they have the advantage of being lightweight and slim. But they are prone to one serious problem: swelling.
Here’s the picture of a tiny li-po cell that came with a keychain flashlight.
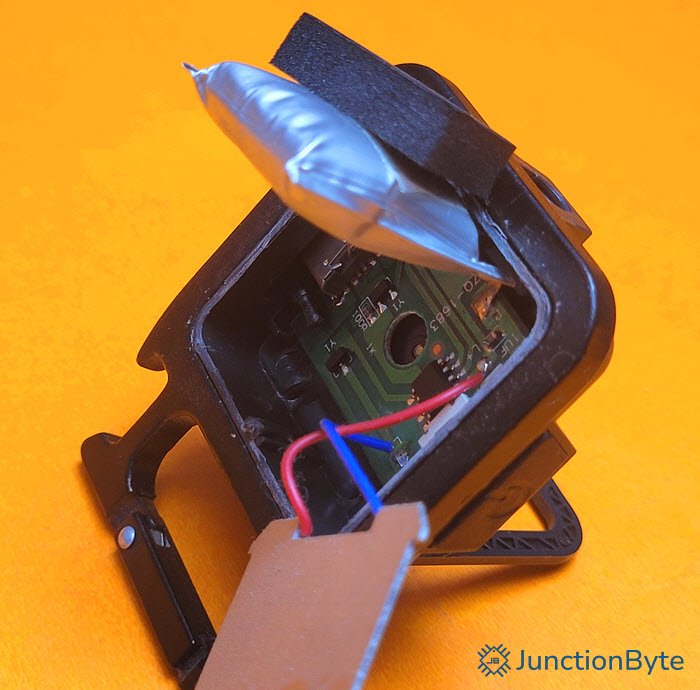
Not only this, several power banks that I owned or some of my colleagues owned had the same fate. The batteries swell after a few months and there’s nothing we can do. This and the fact that most power bank manufacturers are making it extremely difficult to open the cases means that if there is an issue with the battery (swelling or otherwise), it becomes junk.
On the contrary, the 18650 (or most cylindrical lithium cells) are much safer to work with. Got a power bank with 18650 batteries? You can at least try to replace degraded cells rather than throwing the entire unit in garbage. This is one reason why I became interested in the DIY Power Bank Case. Enough ranting, let us get on with the actual review of the power bank case.
Unboxing
There isn’t much to unbox as the package contains the power bank case and nothing else. The box has some warnings printed on the back and no other specifications (input and output ratings).

Design
This Power Bank Case is designed to work with 18650 Lithium Ion batteries and it can accommodate up to 6 cells. Keeping this in mind, the overall size of the case is slightly larger than your typical off the shelf power banks. It measures 14cm x 8cm x 2.5cm (l x w x h). On the front of the case, there is a charge indicator display on the top and a button to its right.

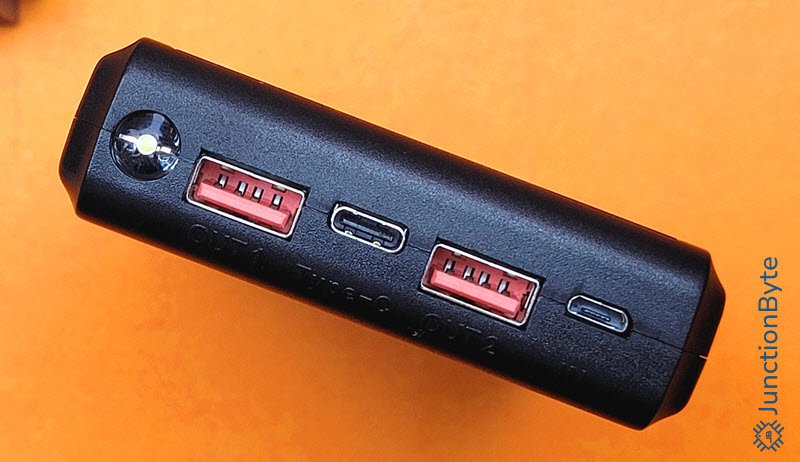
The top edge houses all the ports: 1 x Micro USB, 2 x USB-A, 1 x USB-C. Apart from the ports, the top edge also has an LED that acts as a flashlight. This is a standard 8mm White LED. There is nothing on the other edges.
If you turn your attention to the back of the device, you can see the input and output ratings as well as all the fast charging protocols it supports. Now, the back of the case also acts as the battery cover. There are no screws to remove the cover but an interesting knob that holds the cover in place.
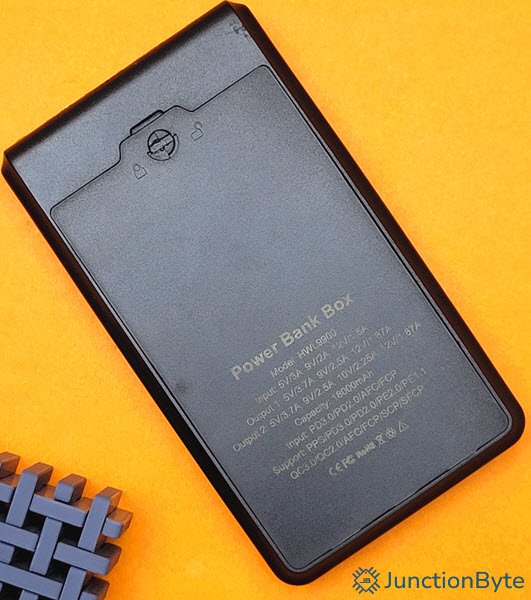
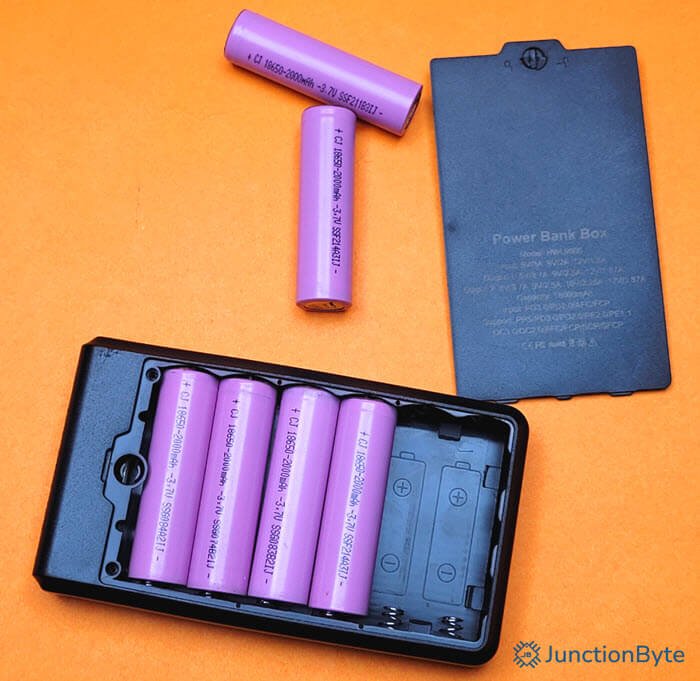
You can use a flat-head screwdriver (or something similar) to unlock the knob and lift the back cover to reveal the 6 18650 battery slots.
This power bank case supports 18650 batteries with capacity up to 3,000 mAh. So, the maximum capacity you can expect is 18,000 mAh.
User Interface
I have some good quality 18650 batteries each with a capacity of 2,000 mAh. These batteries support high discharge currents up to 20A (not that it matters here). I inserted six batteries in the slots. Keep an eye on the polarity of the batteries. Although the product page specifies the power bank has reverse polarity protection, it is better to be safe from our end (and no I did not test for this feature).
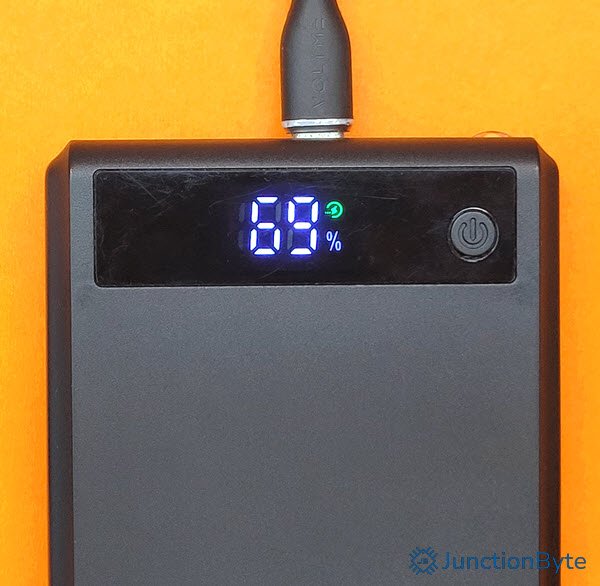
For the user interaction, the power bank has a push button and a LED Segment Display. If you single press the button, the display shows the remaining level of charge (as percentage) for about a minute and then goes back to sleep. You can double press the button to briefly show the charge level (for only about a second).
Press and hold the button for about three seconds to activate (or deactivate) the flashlight. It is nothing fancy but just a regular 8mm LED.
There is one more icon on the display which I will discuss in the later sections.
Input (Charging the Power Bank)
Let us look at charging the power bank. As I mentioned before, this power bank case has four ports (2xUSB-A, 1xUSB-C, and 1xmicroUSB). Of these, you can use the microUSB and USB-C to charge the power bank. Normally, with microUSB ports, you are often limited to standard charging speeds (5V⎓2A). Things are slightly interesting with this power bank case though. Even the microUSB port supports fast charging. In my testing, the power bank accepted 9V⎓2A when I plugged in a microUSB Cable with a USB Fast Charger.
When you charge the power bank through its USB-C port, things are much more predictable. This power bank case supports fast charging of its own batteries with the USB-C Port (of course, with a suitable power adapter). The product info says it supports input charging of 9V⎓2A and 12V⎓1.5A (apart from the standard 5V). As far as the fast charging protocols are concerned, the power bank supports USB PD and QC.
However, while testing, I couldn’t get the power bank to accept 12V at all (I tried using several USB Fast Charging Adapters). The maximum input charge it could accepts is 9V⎓2A (18W). Even if it supported 12V⎓1.5A, the power is still the same at 18W, but smaller current means less heat.
If we use a USB charger that supports fast charging to charge the power bank, a green symbol appears on the display. This indicates that the power bank is fast charging. The same symbol appears when the power bank is fast charging external devices as well (mobile phones, for example).
Overall, I am very happy with the power bank case when it comes to charging it. We are not stuck with standard USB charging.
Time Taken to Fully Charge the Power Bank
In my case, I used 6 18650 batteries with 2,000 mAh capacity each. So, the overall capacity is (theoretically) 12,000 mAh. I completely discharged the power bank till it showed 0% on the display and charged with 9V⎓2A (18W). It took 2 hours 45 minutes to fully charge the power bank. I know this is highly dependent on the condition of the 18650 batteries. But you can get an idea about the charging speeds.
Output (Charging External Devices from Power Bank)
Now the important part: charging devices such as mobile phones from the power bank. For output, this power bank case has three ports: 1xUSB-C and 2xUSB-A. Let me explain the capabilities of these ports individually.
USB-C
The USB-C port on this power bank case supports all the popular fast charging protocols. I used the FNIRSI FNB58 to detect the fast charging protocols and here are the results:
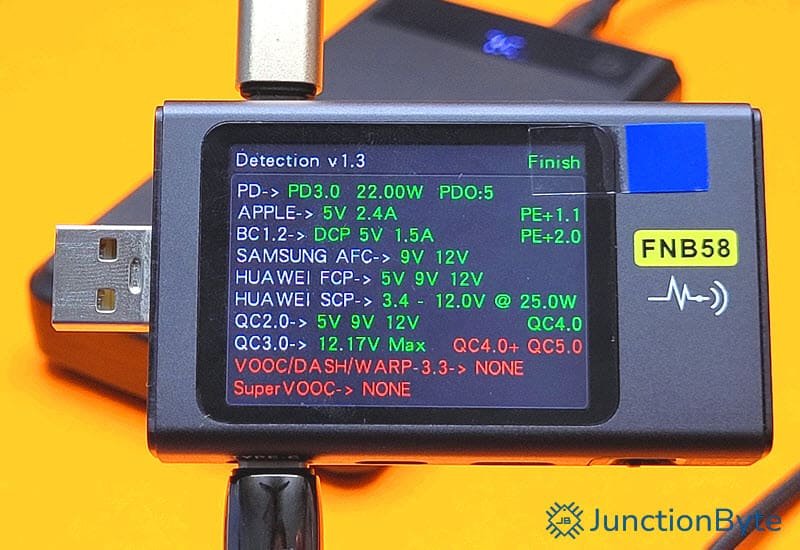
As you can see it supports USB PD3.0, QC3.0, QC2.0, Samsung AFC, Huawei SCP and FCP, among other things. You can use it with mobile phones from all the major manufacturers (Apple, Samsung, Xiaomi, etc.,) and charge with a maximum power of 22.5W.
Coming to the output voltages and currents, here are the maximum ratings from the USB-C Port:
| 5V | 3A |
| 9V | 2.5A |
| 12V | 1.9A |
These are the maximum currents that the power bank can deliver at respective voltages for an extended duration (I tested for 30 minutes at each voltage level) without significant voltage drop. 5V output was reading 4.8V, 9V output was reading 8.4V, and 12V output was reading 11.6V.
USB-A
Before looking at the fast charging protocols and output ratings, I would like to mention that both the USB-A Ports are completely identical i.e., they both support the same output voltages, currents, and fast charging protocols.
Speaking of which, here’s the result from the FNIRSI FNB58 when tested with both the USB-A Ports for fast charging protocols:
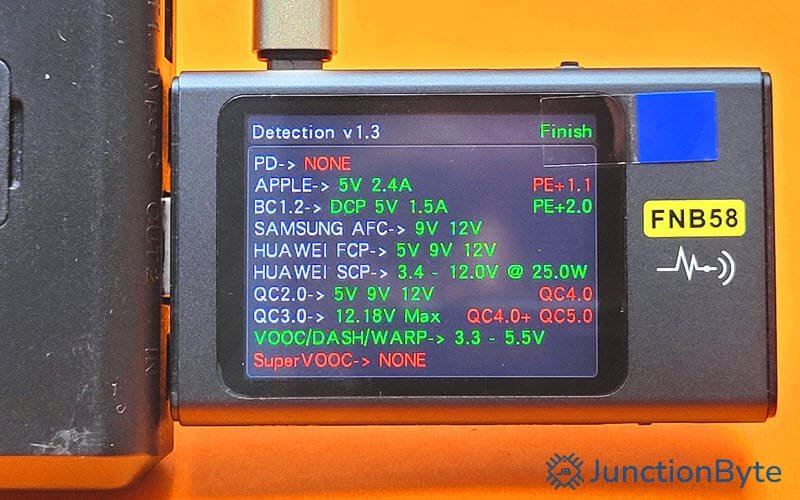
As you can see, the USB-A ports support all the major fast charging protocols (QC2.0, QC3.0, Samsung AFC, Huawei FCP and SCP, etc.,) excluding USB-PD (as USB-PD only works with USB-C). Surprisingly, these ports also support VOOC (Dash or Warp), albeit the voltage is limited to 5.5V.
Here are the output voltage and the corresponding maximum current ratings from the USB-A Ports:
| 5V | 3A |
| 9V | 2.5A |
| 12V | 1.9A |
While the numbers are identical to what we got from USB-C Port, the voltage drop is where the difference lies. In the case of USB-A Ports, 5V output was reading 4.7V, 9V output was reading 8.9V, and 12V output was reading 11.9V.
Note that all these voltage drops are measured directly at the ports without any cables.
Battery Voltage Levels
I measured the battery voltage at different levels of charge (as indicated by the % on the unit’s display). Once again, these numbers are highly dependent on the 18650 batteries and their level of degradation. So, use them only as a reference. That said, here’s my findings:
First, while charging at 9V⎓2A. I completely drained the power bank to 0%. After allowing the batteries to recover for a duration of 30 minutes, I measured the battery voltage (directly across the battery terminals) and it was 3.225V when the level of charge is 0%. The following table shows the rest of values:
| Level of Charge | Battery Voltage |
| 0% | 3.225V |
| 25% | 4.016V |
| 50% | 4.150V |
| 75% | 4.188V |
| 100% | 4.203V |
Later, I performed a similar test, but this time while discharging the battery. I connected a load to draw 5V⎓2A and here are the battery voltages:
| Level of Charge | Battery Voltage |
| 100% | 4.190V |
| 75% | 3.960V |
| 50% | 3.861V |
| 25% | 3.743V |
| 0% | 3.027V |
After 30 minutes of recovery, the batteries were at 3.205V. Based on these tests, we can say that the power bank tries to keep the battery voltage between 3.2V (fully discharged – 0%) and 4.2V (fully charged – 100%).
Temperatures
We know that some sort of DC-DC conversion is happening behind the scenes to charge 3.7V lithium ion batteries with 9V input as well as providing 12V output from 3.7V batteries to charge external devices. So, heat is definitely an important factor. So, I measured the temperature of the main PCB in different scenarios and here are my findings.
While Charging the Power Bank
First, we will look at the temperatures when charging the power bank with 9V⎓2A. The hottest component is the main SoC (which we will get to in the next section). So, I’ve compiled the temperatures of this IC at different levels of charge.
| Level of Charge | SoC Temperature |
| 25% | 81.3°C |
| 50% | 80.6°C |
| 75% | 51.5°C |
| 100% | 38.2°C |
This is fairly reasonable as initially the power bank tries to charge the batteries with a “Constant Current” profile and a current of 2A (at 9V input, as per the datasheet of the SoC).
While charging, the SoC continuously monitors its temperature and if it exceeds 115°C, then the charging current drops. If it reaches 150°C, then the SoC initiates a thermal shutdown.
While Discharging the Power Bank (To Charge External Devices)
First, I connected an electronic load to draw 5V⎓2A from the power bank. Even after 30 minutes, the temperatures never crossed 50°C (the maximum I measured was 47.4°C). So, if you are charging small gadgets such as earbuds, headphones, or other similar low power devices, the power bank stays relatively cool.
Now the interesting part. For the next test, I set the power bank output manually (using FNIRSI FNB58 to trigger different voltages) and pulled maximum possible current at those voltage levels. Here are the temperatures of the SoC:
| Output Voltage and Current | Port | |
| USB-C | USB-A | |
| 5V @ 3A | 66.6°C | 68.1°C |
| 9V @ 2.4A | 102.5°C | 102.6°C |
| 12V @ 1.9A | 100.9°C | 100.5°C |
These are the temperatures I got after 10 minutes of drawing respective output voltages and currents. Unless you manually set the current, you will never reach these currents for normal charging (even fast charging mobile phones). So, the chances of hitting these temperatures are slim to none.
You will never feel the heat under normal circumstances (maybe slightly warm to touch). I had to teardown the unit to get these readings.
Teardown
As a bonus, I would like to share some teardown pictures of the main PCB and the SoC. First of all, do not attempt to disassemble the case as there are plastic latches that will break easily as you try to pry the two pieces apart.
Coming to the main PCB, I was surprised to see only a few components on the board. After some digging, I found the data sheet of the SoC and it packs a pretty punch.
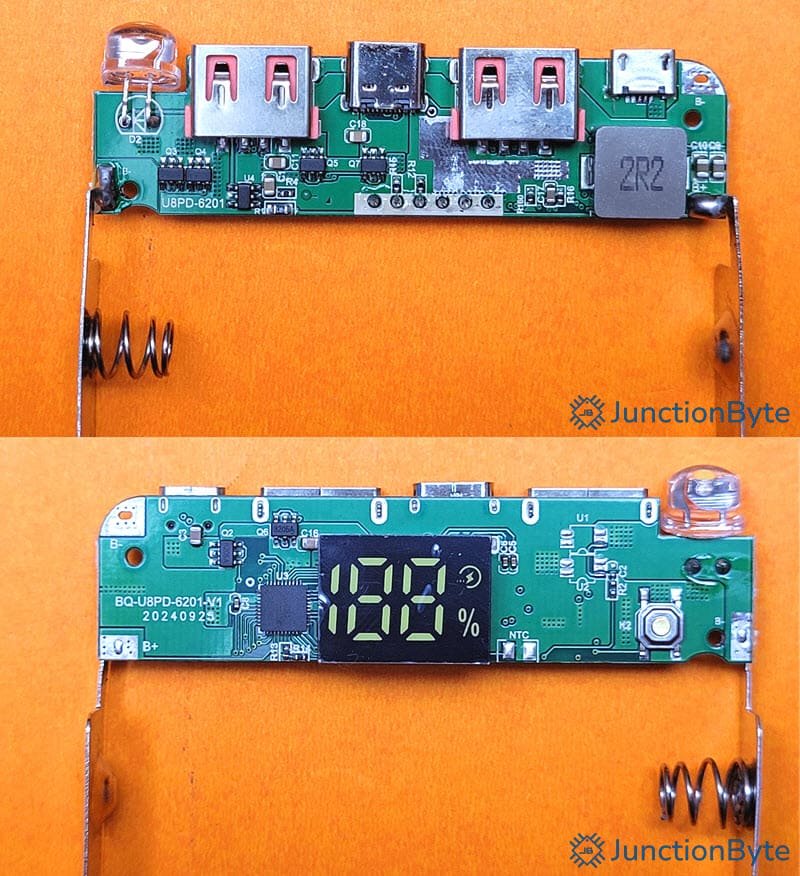
The markings on the SoC are “S621” and the manufacturer is iSMARTWARE. It is a dedicated, highly-integrated power bank IC with built-in Power Control Module, Fast Charge Protocol, LED Driver, among other things.
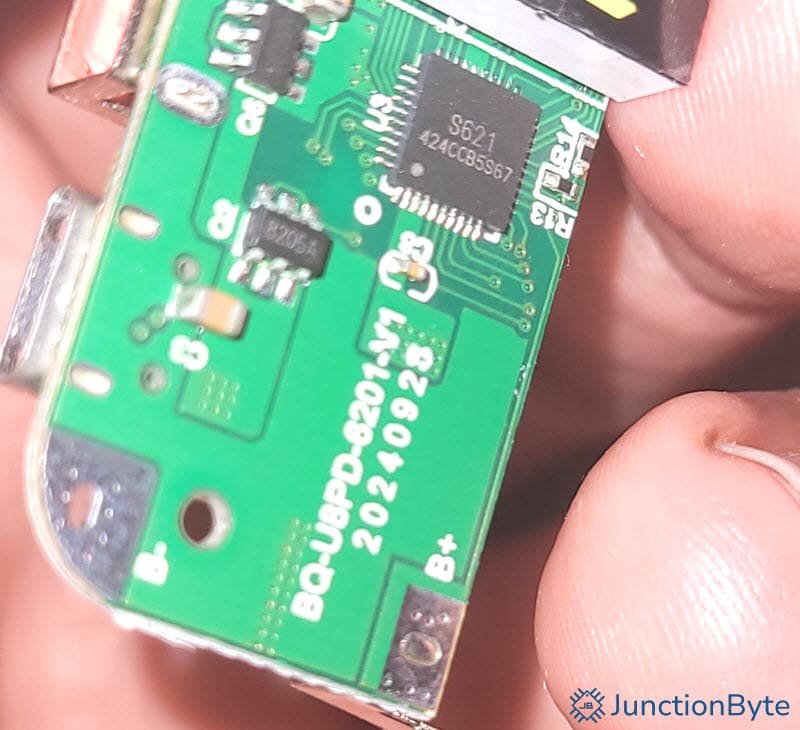
I will leave a link to the datasheet of S621 SoC but keep in mind that it is in Chinese. The power bank circuit is identical to the reference application design in the datasheet. If you are planning to build something similar yourself (I know I will be), you can use this as a starting point.
Price
I bought this DIY Power Bank Case from “SUNSKY-ONLINE” for about ₹750 (~$9) including shipping. There are some more power bank cases that I got (one is similar to this but smaller with 4 18650 batteries and another that accepts 21700 batteries and has wireless charging). I will review those as well very soon.
Conclusion
Overall, I am pretty pleased with the HAWEEL DIY Power Bank Case. With support of up to 6 18650 batteries and a potential 18,000 mAh capacity, this power bank case definitely takes the “DIY” part to the next level. One of the main selling points (at least for me) was the bi-directional fast charging capability.
And as far as the fast charging protocols are concerned, it supports all the major ones (USB PD with PPS and QC3.0 being the popular options).
The build quality is good and when you fill it with all 6 batteries, you will definitely feel its heft. My only concern is the design of the back cover (specifically the lock/unlock mechanism). They should’ve gone with a regular screw type back cover.
If you have some spare 18650 batteries and are looking to build a power bank with fast charging support, then I would highly recommend this power bank case.