While learning the 8051 Microcontroller Architecture, its internals, SFRs, etc. is essential, the only way to test all that theory is to practically do something with the Microcontroller. Yes. I’m talking about writing a program for the 8051 Microcontroller. But the important question is, “Which application should I use to write 8051 Programs?” If you are not new to the world of 8051 Microcontroller, then you might have heard of Keil µVision IDE. It is one of the popular application development platforms of 8051 Microcontrollers (among other things). So, in this guide, I will show you how to program an 8051 Microcontroller in Keil µVision IDE.
As this is a beginner’s guide, I will mainly discuss how to install the application, set it up, and write a basic program. In the later guides, I will talk about the structure of the actual 8051 Microcontroller C Program.
If you haven’t gone through some of the previous guides on 8051 Microcontroller, I highly recommend you refer to them. Those are mainly theoretical guides but very useful to understand the basics.
- 8051 Microcontroller Introduction
- 8051 Microcontroller Architecture
- 8051 Microcontroller Pin Diagram and Pin Description
- 8051 Microcontroller Memory Organization
Introduction
The Arduino IDE is the main software that allows you to write applications (or Sketches, as Arduino calls them) for various Arduino Boards (Arduino UNO being the most popular one). You can simply download and install the IDE, write the program, hit the upload button, and boom, your Arduino will run the code instantly.
When it comes to 8051 Microcontrollers, things aren’t that straightforward though. For starters, you need one application to write the program, a special piece of hardware to ‘program’ the microcontroller (i.e., to upload the code to the internal ROM-Program Memory), and another software that works with the programming hardware.
Yes. This procedure is fairly common for most of the old school microcontrollers (8051, AVR, PIC, etc.) where we (might) have to use multiple applications and a dedicated programming hardware.
In case of the 8051 Microcontroller, the two popular software for developing applications are:
- Keil µVision IDE
- IAR Embedded Workbench for 8051
Both these tools are proprietary with their respective Compilers for the 8051 Microcontroller. The Keil µVision IDE is somewhat better as it provides a non-commercial free version of the tool for all users (with some limitations though). You can use the IAR Workbench for 8051 only for 14-days before the trial period expires.
So, in this guide, I will be using the Keil µVision IDE to write programs for the 8051 Microcontroller.
NOTE: There is a free alternative in the form of SDCC or Small Device C Compiler. It supports several 8-bit Microcontroller Architectures, including the 8051/MCS-51. There is no dedicated IDE or proper development application for SDCC. You can use it with PlatformIO (which I will explain in a separate guide).
What is Keil µVision?
Keil µVision (pronounced micro vision) IDE is a popular (might even be the most popular) application development platform for 8051 Microcontrollers. The C51 Compiler, which was developed solely for 8051 Microcontroller, is often regarded as one of the best compilers for this platform. You can write applications in good old C Programming Language and the C51 Compiler produces highly efficient output both in terms of speed and size.
Apart from the C51 Compiler, the Keil µVision IDE has the following features (some of the important ones):
- Source Code Editor
- Macro Assembler, Debugger, Linker
- Simulator
- Wide Device Support
- Flash Programmer
- And many more…
One important thing to know about the Keil µVision IDE is that it is not a free tool. Yes, there is a free version available for non-commercial purposes (known as Community or Evaluation version) that is code limited (only 2KB Object Code). To unlock all the features, you need to purchase a license (which is really expensive).
Still, we will stick to the basic Evaluation version of the tool as there are no proper alternatives.
Install Keil µVision IDE
The first step is to download and install the Keil µVision IDE. Before proceeding, I would like to mention that Keil µVision IDE is a Windows-only tool (as the development started with MS-DOS). There are no versions for Linux or macOS.
That said, head over to Keil’s official website, navigate to C51 Download Page, fill out the form, and download the executable. At the time of writing this guide, the latest version was “C51V961.”
The installation process is fairly simple. Just double click the executable and follow the on-screen instructions. I left the installation location at its default (which is ‘C:\Keil_v5’). If you want, you can change this location as per your requirement.

Once the installation finishes, it will create a Desktop shortcut for you.
Create Your First 8051 Microcontroller Project in Keil
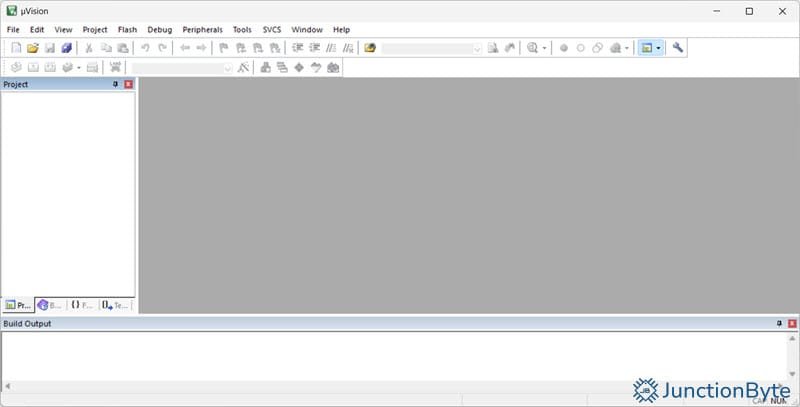
You can launch the Keil µVision IDE either by using the Desktop shortcut or searching for ‘Keil uVision5’ in Windows Search (Start Menu). I will explain different parts and functions of the IDE as we explore further.
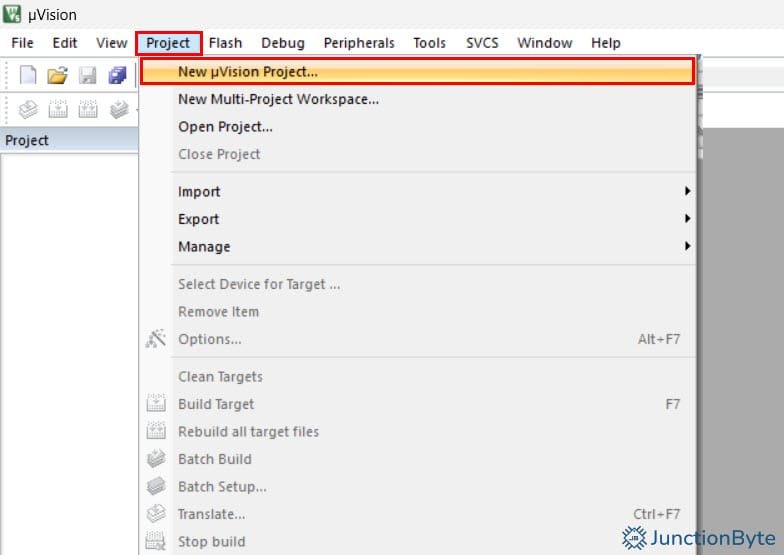
Now, we are ready to create the project. Navigate to ‘Project -> New µVision Project…’ You need to select a location and give a proper name to the project. I gave it ‘1-Demo-Project’ for the sake of convenience. It will create a project with extension ‘.uvproj’ (so, the project in my case will be 1-Demo-Project.uvproj).
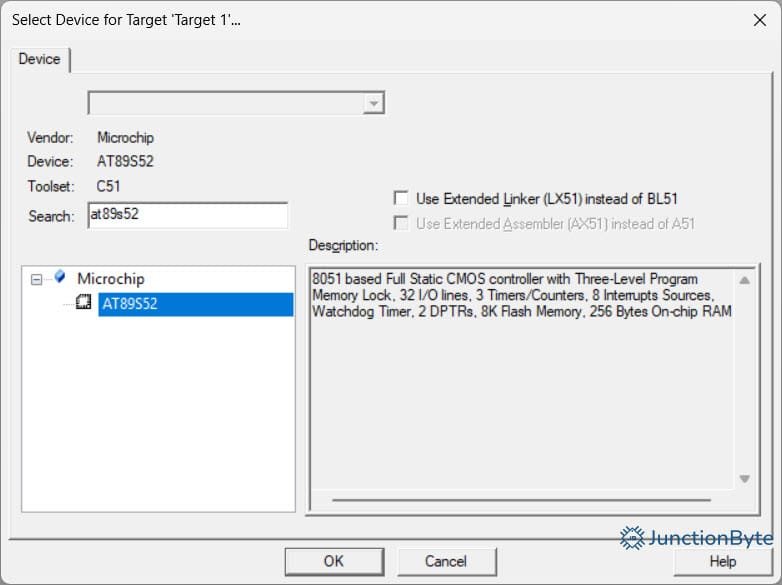
As soon as you provide a name, a new window pops up with a title ‘Select Device for Target Target 1.’ As the name suggests, this is where we need to select the appropriate device we will be working on.

If you look at the bottom section, there is a huge list of manufacturers and supported devices. For this guide (and for the rest of the 8051 Microcontroller Series), I will be using Atmel’s (now Microchip) AT89S52 Microcontroller.
You can use the ‘Search’ tab to easily locate the device. When you click on the result (i.e., AT89S52), you will get a brief description on the right side.
Next, the IDE will ask you if you want to add the ‘Startup’ code to the project. For this particular Microcontroller, we can ignore this. So, click on ‘No’ and the IDE will create a blank project.

This is only the first step as we are yet to create source codes and configure the IDE, which I will explain in the next sections.
Add Source Code to Keil µVision Project
We are now ready to create the main source code. Right click on the ‘Source Group 1’ folder and select the ‘Add New Item to Group Source Group 1…’ option. You will get a pop up where you need to select the type of file you want to create and provide a name.
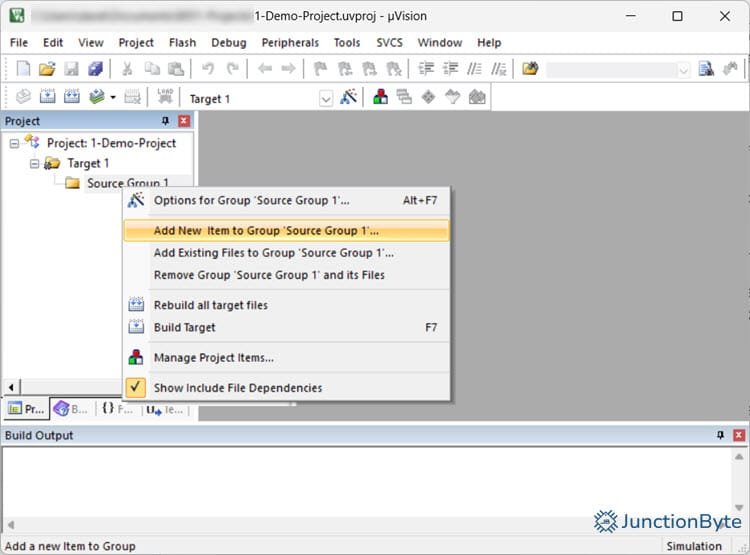
Since we will be working mainly with C Programming Language, we have to select the file type as ‘C File (.c)’ and give it a name ‘main.’ You can give the file any name as long as it contains the ‘main’ function.

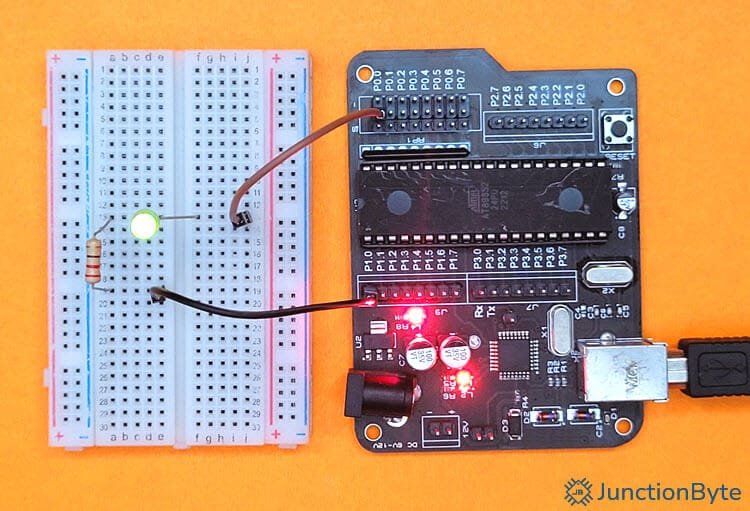
Circuit Diagram of the Project
Before writing the code, I would like to explain what we are going to do in this project. As this is just a demo explaining the setup of Keil µVision IDE, the idea behind the project is rather simple. I will connect a green LED to P1.0 Pin of the 8051 Microcontroller and blink it.
Here’s the circuit diagram of my project:

Write Your First Program in Keil µVision IDE
We are now ready to write the program in the ‘main.c’ file. As this is just a guide on how to program an 8051 Microcontroller in Keil µVision IDE, I will not go into the details of the actual program. However, here is a simple program that will blink an LED connected to the Pin P1.0 of the Microcontroller.
#include<reg52.h>

void delay (unsigned int); /* Delay Function Prototype*/

sbit LED = P1^0; /*Assigning a Variable 'LED' to Port 1 Pin 0*/

void main()
{
	while(1)
	{
		LED=0; /*Turn LED ON*/
		delay(1000); /*Wait for approx. 1s*/
		LED=1; /*Turn LED OFF*/
		delay(1000);/*Wait for approx. 1s*/
	}
}
/*Delay Function Definition*/
void delay (unsigned int d)
{
	unsigned int i=0;
	for(;d>0;d--)
	{
		for(i=100;i>0;i--);
		//for(i=248;i>0;i--);
	}
}
Use this code as a reference and save the file. We have two choices next. If you have the hardware and want to test the code, you can compile the code and generate the Object file (which we can upload to the on-chip Program Memory).
Alternatively, the Keil µVision IDE has an excellent feature known as ‘Simulator’ that allows you to test the code even without any microcontroller hardware. In this guide, I will go with the first option i.e., use real hardware and test the code.
Target Options in Keil µVision IDE to Generate HEX File
Right click on the ‘Target 1’ folder in the left project window and select the ‘Options for Target Target 1…’ option. You can also use the keyboard shortcut ‘ALT+F7’ or navigate to ‘Project -> Options for Target Target 1…’ as well.

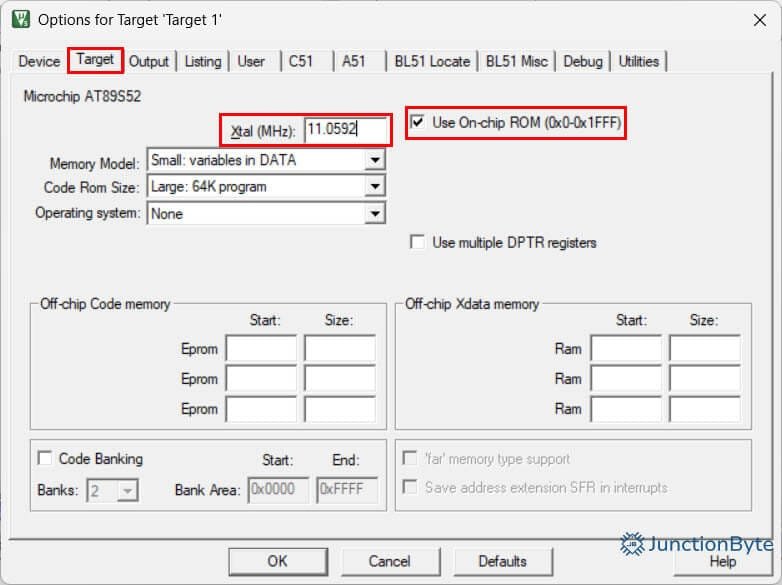
A new ‘Target Options’ pops open. We can keep most of the settings at their default values. However, there are a couple of important ones that we need to modify.
In the ‘Target’ tab, set the ‘Xtal (MHz)’ to 11.0592 (as it is the value of the Quartz Crystal on my development board). In case your development board has a different Crystal, enter the appropriate frequency here.
Then, check the box next to the ‘Use On-chip ROM (0x0-0x1FFF)’ option.
Move to the ‘Output’ tab and under the ‘Create Executable’ section, check the box next to the ‘Create HEX File’ option.
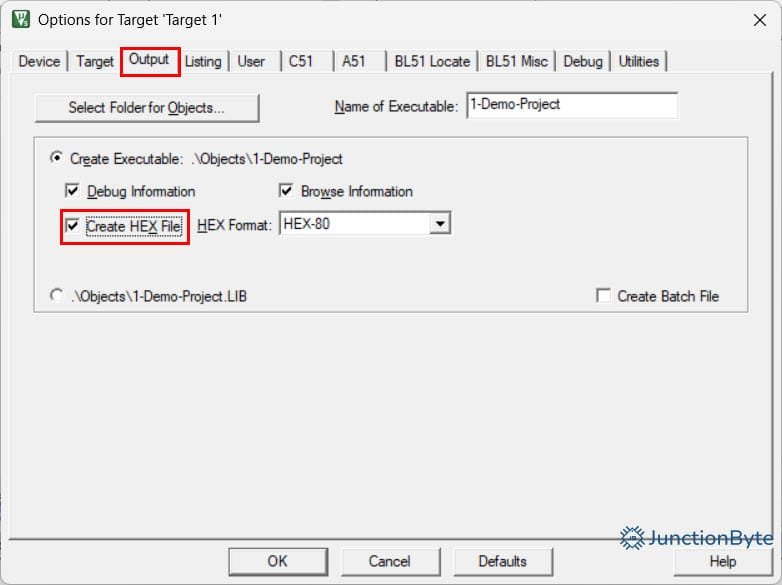
This step is important if you want the Keil µVision IDE to generate the HEX file that goes into the Microcontroller.
Build the Project
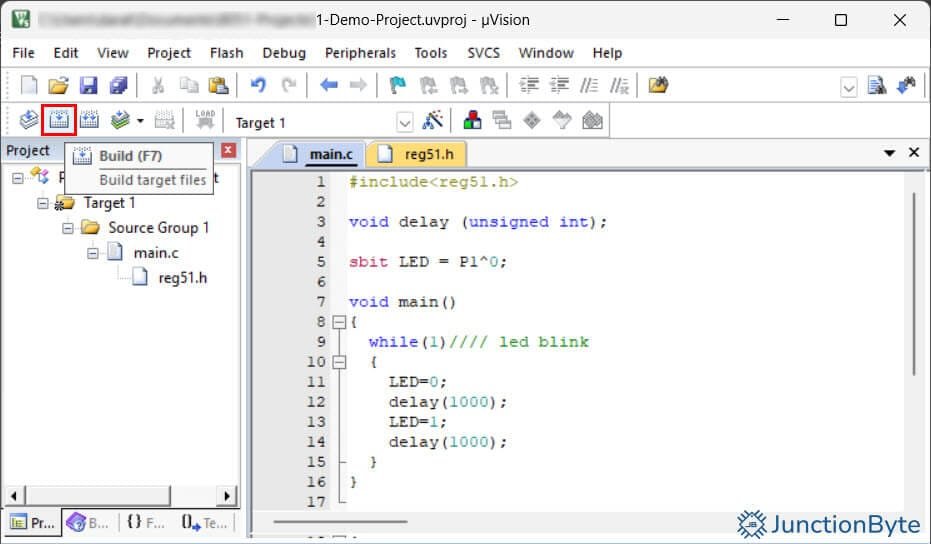
We will now focus on compiling the project. If you look at the ‘Build Toolbar’ (third row at the top), we have a bunch of shortcuts for compiling and building the project.
Of the available options, the second one i.e., ‘Build’ is important for us. If you click this option, the IDE will compile the code, assemble it (using assembler), links it (using linker), and generates the HEX file (using HEX converter).
There are multiple ways to build a project (right click on Target 1, through the Project menu from the toolbar, or keyboard shortcut F7). As soon as you click the ‘Build’ option, the Keil µVision IDE invokes all the tools and you can see the result in the ‘Build Output’ below. If there are any errors, the Build Output window will show them.
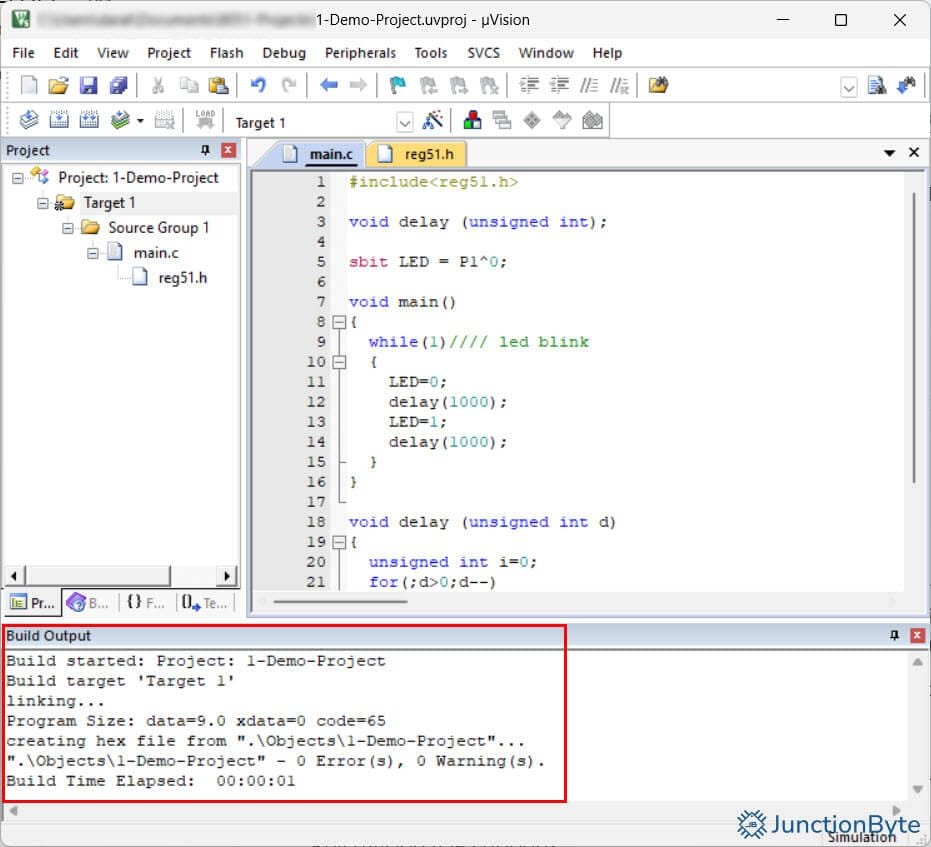
It also shows the location where it saved the HEX file (in the ‘Objects’ folder inside your project directory).
How to Upload Code to 8051 Microcontroller?
Like I said in the earlier section, generating the HEX file is the easy part. Since the 8051 Microcontroller (at least the AT89S52) doesn’t have any bootloader, we need a special piece of programming hardware in order to upload this HEX file.
USBASP Programmer
One popular option is a USBASP Programmer. It is a USB Programmer for AVR Microcontroller but works with some variants of the 8051 Microcontroller (especially the ones that are produced by Atmel). You can get this programmer for very cheap.
Assuming you already have a basic 8051 Development Board with the minimum configuration circuit (Reset, Clock, etc.), here are the connections between the USBASP Programmer and the 8051 Microcontroller:
| USBASP | 8051 Microcontroller (AT89S52) |
| VCC | VCC |
| Reset | RST |
| MOSI | P1.5 |
| MISO | P1.6 |
| SCK | P1.7 |
| GND | GND |
You need a special driver for the USBASP Programmer to work on Windows. I’ll leave a link to the official page of the USBASP Programmer where you can download the driver installer (Zadig). While it supports several ‘USB’ drivers, we need to install the ‘libusb-win32’ driver for USBASP to work.
In my case, the development board I use already comes with the programming hardware. All I need to do is connect the board to the computer, make necessary external connections (to the LED), and use the software to upload the code.

ProgISP Software
Coming to the software for the USBASP Programmer, there are again several options but I got pretty used to an old software known as ProgISP. You don’t have to install it and all you have to do is run the executable.
After making the connections between the microcontroller and the USBASP Programmer, open the ProgISP application. Select the right microcontroller using the ‘Select Chip’ option (AT89S52 in my case). If it detects the hardware, the ‘PRGISP’ option right to the microcontroller will become active (not grayed out).
From the right side menu, click on ‘Load Flash’ and select the HEX file that we generated earlier. You need to to have the following options checked:
- Verify Signature
- Chip Erase
- Program FLASH
- Verify FLASH

Finally, click on the ‘Auto’ button and if everything goes well, the software works with the USBASP Programmer and uploads the HEX file to the on-chip Flash Memory (Program Memory) of the 8051 Microcontroller (AT89S52).
If you made the circuit connections as per the code (and the circuit diagram), the LED should blink roughly with a 1 second delay.
Conclusion
This was a pretty elaborate guide on how to program an 8051 Microcontroller in Keil µVision IDE. I showed you all the steps you need to follow to configure the IDE in order to successfully compile and generate the HEX file.
I also talked about the programming hardware (USBASP) and software (ProgISP) that I used. In the next guide, I will show how to use PlatformIO to program an 8051 Microcontroller (using SDCC).