In the previous post, I reviewed a very useful gadget for DIYers: a DIY Power Bank Case. It supports up to 6 18650 Batteries, has bi-directional fast charging, and the maximum power you can draw is 24W. The unit is slightly larger than your typical power bank and might be a bit heavy to carry in your pocket (assuming you filled all the six slots with 18650 batteries). If that is the case, then you might be interested in the next product I bought. It is from the same brand “HAWEEL” and has room for up to 4 18650 batteries. You will lose some capacity (4 batteries vs. 6 batteries) but the size is compact and the best thing is it supports two way fast charging (albeit only 18W).
This is the review of 4×18650 DIY Power Bank Case with QC. I have been using this power bank case for a couple of weeks now and will share my experience of the product. If you are looking for a compact DIY Power Bank Box with fast charging support, then continue reading the review.
NOTE: The package contains only the power bank case and doesn’t include batteries. You have to source the batteries separately.
Unboxing
Let us start the review by looking at the contents of the package. Speaking of which, the box has some basic specifications printed on the back (input and output voltages and currents), fast charging protocols, etc.
Inside the box, we get the main power bank case, a tiny screwdriver, 4 screws, and some rubber feet/plugs to cover the screw holes.
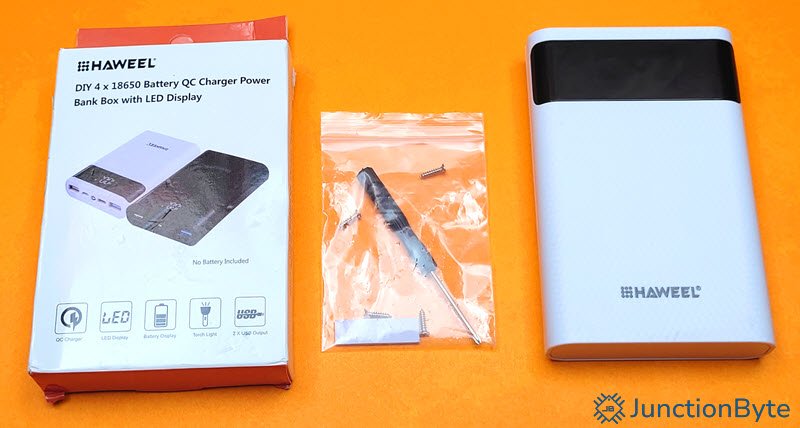
I chose the white color option but you can also get the power bank box in black as well.
Design of the Power Bank Case
The design profile of this power bank box has a known traditional approach. On the front, you get a LED Segment display to indicate the level of charge in percentage. Additionally, the display also shows the direction of current as “IN” when the power bank is charging and “OUT” when the power bank is charging external devices (mobile phones, etc.).
When charging external devices, the display also shows 5V 2.4A in case of regular charging or QC with two thunderbolt symbols (🗲) in case of fast charging.

If you look at the top edge of the unit, it is where all the ports are located. Here’s a list of port on this 4×18650 DIY Power Bank Case:
| Port | Supported Direction |
| USB-A (2.0) | Output |
| microUSB | Input |
| USB-C | Input/Output |
| USB-A (3.0) | Output |
I’ll talk about the voltage, current, and fast charging protocols of these ports in the next section.
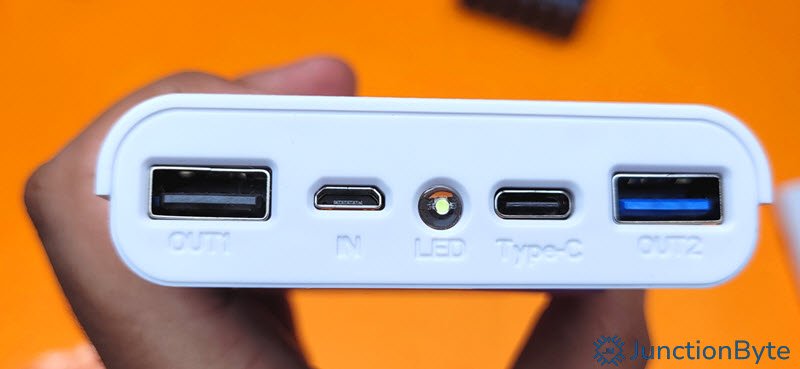
Apart from these ports, the top edge also has a tiny White LED. You can turn this LED ON/OFF by pressing and holding the button on the side for about 3s. This button also wakes the device from sleep and displays the charge percentage for about 30s.
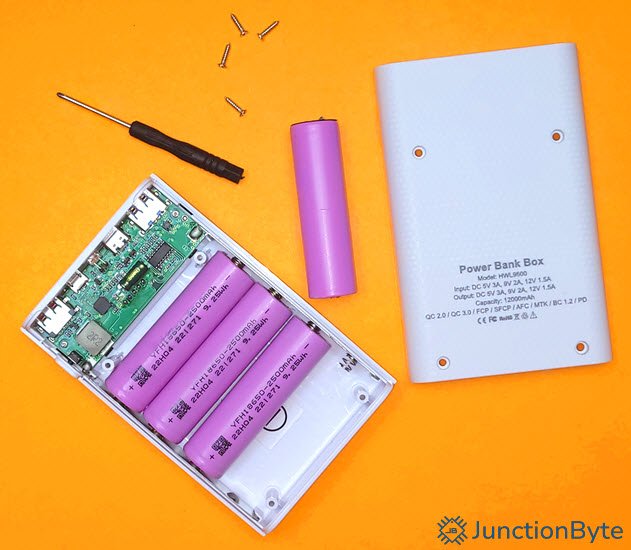
If you turn your attention to the back of the unit, you can see the back cover has the specifications printed on it. The back cover is held firmly with the help of 4 screws. You can fasten the screws that came in the package after you insert the batteries.

On the inside, you can see the main PCB as well as the four slots that hold 4 18650 batteries. It has clear markings for the positive and negative terminals of the battery (and a big warning label).
Performance
I inserted four good quality 18650 batteries in the Power Bank Case and performed a series of tests. Here are my findings:
Ports and Fast Charging
You can charge the power bank either through the microUSB Port or the USB-C Port. Surprisingly, both the ports support fast charging of the power bank. With microUSB Port, you can charge the power bank at up to 9V and 2A. In the case of USB-C, it will trigger up to 12V and 1.5A.
Make sure you use a proper fast charging USB Power Adapter while charging the power bank to make use of the fast charging feature.
The USB-C Port also acts as an output port. I connected my trusty FNIRSI FNB58 USB Tester to the USB-C Port and here are the fast charging protocols is supports:
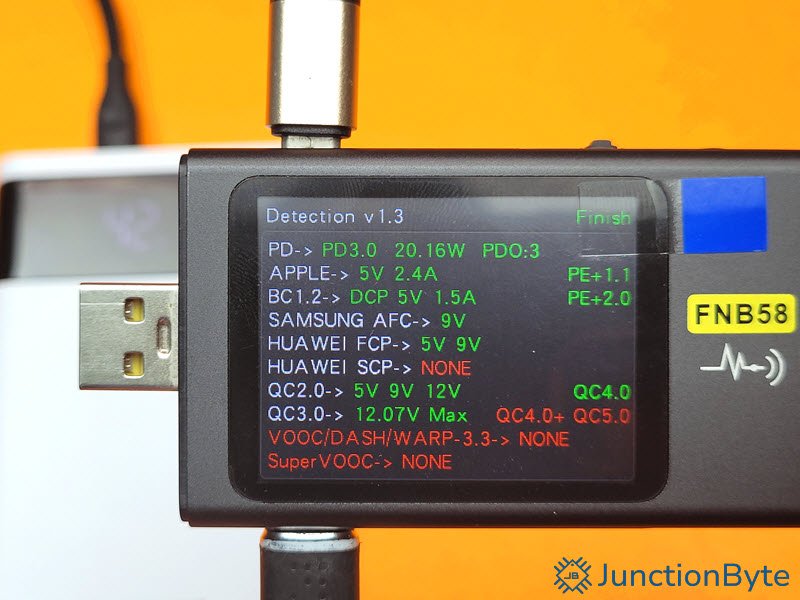
As you can see, the USB-C Port on this power bank supports all the major fast charging protocols (USB-PD, QC 2.0, QC 3.0, etc.).
The two USB-A Ports are not identical. One is a regular port (USB-A with black connector) that doesn’t support any fast charging (only normal 5V 2A charging).
The second USB-A Port (with blue connector) however supports fast charging. Here are the results when I connected my FNIRSI FNB58 to this USB-A Port:
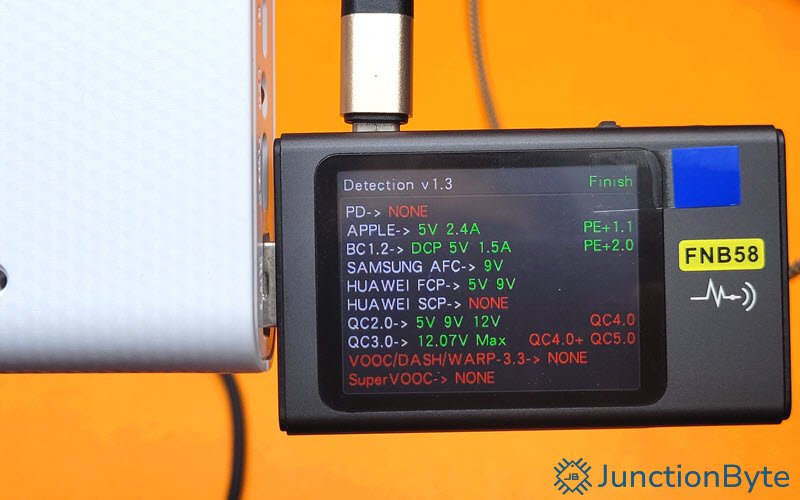
Apart from USB-PD, this USB-A Ports supports other popular fast charging protocols.
In terms of voltages and currents, both the USB-C and USB-A 3.0 Ports have the following values: 5V @ 3A, 9V @ 2A, and 12V @ 1.5A.
Maximum Ratings of the Ports
Here are the maximum values you can draw from the USB-C Port along with the temperature of the main SoC (after about 10 minutes):
| 5V (Voltage Drop 4.7V) | 3.4A | 70.8°C |
| 9V (Voltage Drop 8.8V) | 2.6A | 98.9°C |
| 12V (Voltage Drop 11.8V) | 2.0A | 102.8°C |
Results from a similar test but this time with the USB-A 3.0 Port:
| 5V (Voltage Drop 4.7V) | 2.7A | 53.7°C |
| 9V (Voltage Drop 8.8V) | 2.1A | 77.3°C |
| 12V (Voltage Drop 11.8V) | 2.0A | 105.2°C |
Note that under normal usage conditions, the temps will not be this high. I am manually triggering the voltages and pulling maximum current the power bank can deliver at that voltage without significant voltage drop.
Teardown
I tore down the unit further and took some pictures of the main PCB. The main SoC has “W332” on it. Initially, I couldn’t find any information on this. Upon some digging, I found out that this is an older version of the “IP5332” Power Bank SoC from INJOINIC Technology. If you aren’t familiar, INJOINIC produces some of the popular USB PD Communication ICs (such as the IP2736, IP2721, etc.).
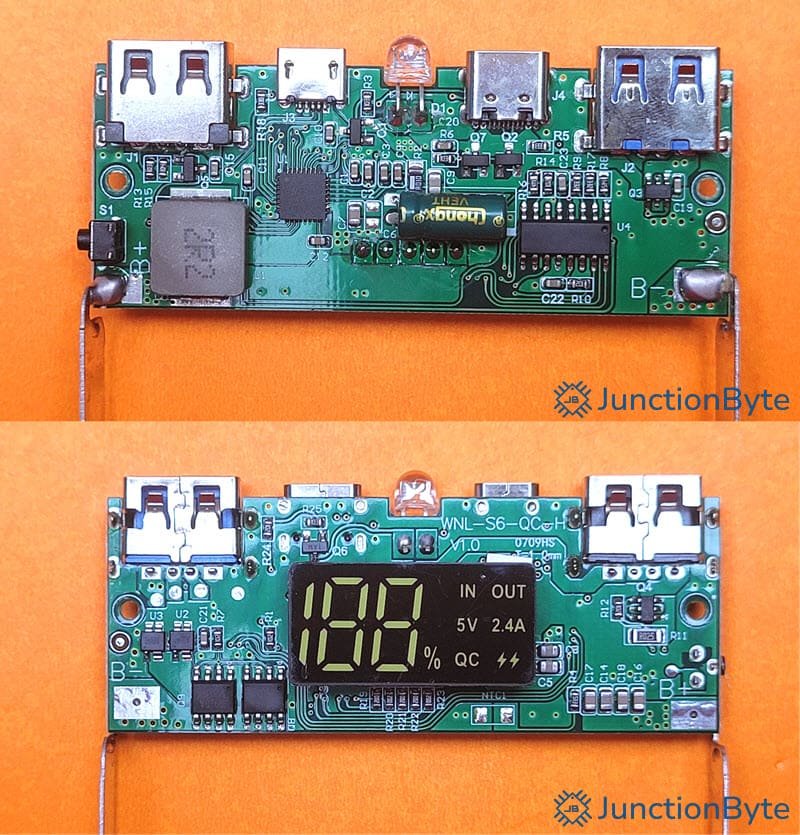
While the W332 (or IP5332) IC is capable of working as a standalone SoC, the power bank PCB has a mystery IC (markings on it were erased). I think this IC is responsible for driving the display unit (not sure though and I did not trace the connections).
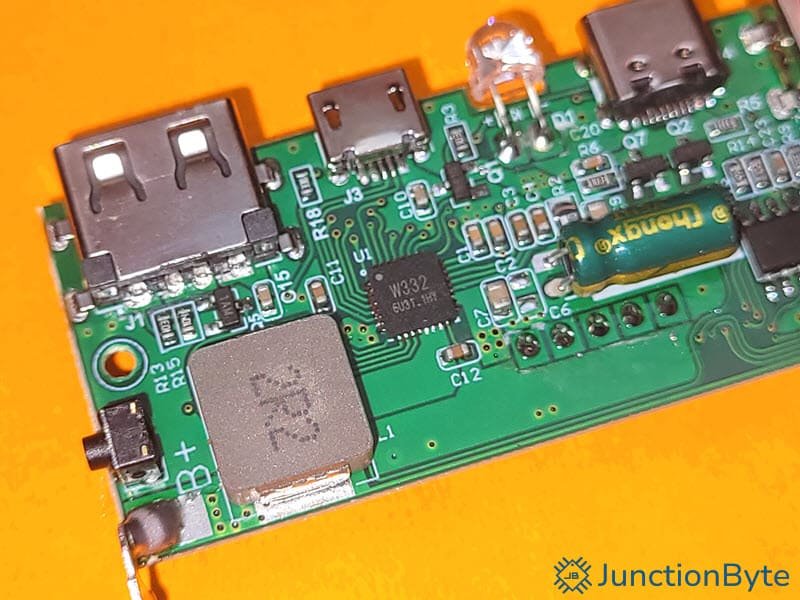
The rest of the components pretty much follow the reference design in the datasheet of W332 (IP5332).
Price
I bought this 4×18650 DIY Power Bank Case for about ₹700 (approx. $8) including shipping. The price seems okay considering you are getting support for two-way fast charging. If you can get this for anything less, then it is definitely a steal (provided you already have some decent quality 18650 batteries).
Buying both the power bank case and the batteries doesn’t make much sense financially.
Conclusion
So, what are my final thoughts on this 4×18650 DIY Power Bank Case? As I said earlier, if you have some spare 18650 lithium ion battery that you don’t want to waste, then using them in DIY projects will give them a new life. One such easy DIY project that almost everyone (even someone without much technical knowledge) can do is a Power Bank. This Power Bank Case can help you achieve that.
It is small and compact (compared to the previously reviewed 6×18650 Power Bank Case) and can easily fit in your jeans pocket. With four 3,000 mAh 18650 batteries, you can get a capacity up to 12,000 mAh. And the best thing is both input and output support fast charging. Definitely worth checking out.
Does this power bank have an always-on mode or support low current / trickle load devices without automatically switching off?
I plan to use it with a small electronics project that draws very little power most of the time, so it’s important that the 5 V output remains active even with a low load.
Thank you in advance for your help
In response to your query, I tested the power bank with a tiny USB LED module. It is nothing fancy–3 LEDS and a current limiting resistor and current draw is about 70mA. The regular USB-A port (USB 2.0 – Black) shutdown after 10s. But the USB-3.0 (Blue) port continued to power the module. Hope this helps.